If you’ve got a billion-dollar app idea but no technical skills to bring it to life, you essentially have 2 options: find a technical co-founder to help you build it or hire someone to do it for you.
In reality, however, finding the right co-founder or agency is often harder than finding the perfect spouse – especially when there’s money involved, and lots of it. Without proper knowledge, you risk making costly mistakes or even losing control of your original vision as your app takes shape.
But here’s the good news: there are key fundamentals of the app development process that every non-technical founder should know. By understanding these basics, you’ll be able to stay abreast of, and keep a close eye on, how your app is coming together.
Think of this guide as your crash course on everything a non-technical founder needs to know – from factors influencing your app development to diving deep into the end-to-end process of app building and some best practices to follow along the way.
Let’s dive in 👇
What is an app development process?
The mobile application development process is an end-to-end development schedule, involving the planning, strategy, development and testing of your app. It contains numerous stakeholders, including app owners, project managers, designers and developers and can last anywhere from weeks to a year.
Before delving into the actual process, it’s important for you to understand all the variables that influence the app development process:
- The type of app - this could be native, cross-platform or hybrid
- Complexity of your app - from off-the-shelf apps to drag-and-drop and custom apps
- App development route - you could hire a freelancer, dev agency or app builder like Builder.ai to build your app
Let’s go through them one at a time.
Types of mobile apps
There are 3 main types of apps: native, cross-platform and hybrid. Each type has its own set of pros and cons that can affect your project.
1 - Native apps
A native app is a software application developed specifically for use on one platform or operating system, such as iOS or Android. As native applications are designed for a particular mobile device, they take full advantage of the hardware and software of the device they're built for, resulting in faster performance and a better user experience.
Native applications are typically installed directly on a user's mobile device. This grants them access to device-specific functions like the camera, microphone, GPS and other hardware features.
Instagram, Google Maps, Spotify and Uber are all examples of native apps.
Pros of native apps
- Optimal performance - these apps are optimised for the platform they run on, making sure they work smoothly.
- Device access - these apps can fully utilise a device’s features, such as GPS, camera and push notifications, providing a richer user experience (UX).
- Enhanced user experience - these apps follow the design and interaction guidelines of their respective platforms, making them user friendly.
Cons of native apps
- Increased development costs - creating separate apps for iOS and Android can be costly and resource-intensive, as it requires specialised skills for each platform.
- Extended time to market - developing for 2 different platforms means more time is needed for coding, testing and debugging, which can delay the app's release.
2 - Cross platform apps
A cross-platform app is a software application designed to function on multiple platforms or operating systems, such as iOS, Android and Windows, using a single codebase. This approach allows developers to write code once and deploy it across various platforms, streamlining the development process.
Cross-platform applications can be installed on a user's mobile device just like native apps. They can access device-specific functions like the camera, microphone, GPS and other hardware features, although the level of access may vary depending on the framework used.
Examples of cross-platform apps include Skype, Slack and Discord.
Pros of cross-platform apps
- Cost-effective development - by using a single codebase, app development costs are significantly reduced compared to creating separate native apps for each platform.
- Faster time to market - with a single codebase, the development process is accelerated, allowing for quicker deployment across multiple platforms.
- Consistent user experience - these apps offer a uniform look and feel across different platforms, enhancing brand consistency.
Cons of cross-platform apps
- Performance limitations - cross-platform apps may not perform as smoothly as native apps because they aren't optimised specifically for each platform's hardware and software.
- Design compromises - cross-platform apps may not fully adhere to the design guidelines of each platform, resulting in a less intuitive user experience.
3 - Hybrid apps
A hybrid app combines elements of both native and web applications, offering a versatile solution. Essentially, it’s a web app but given native app “container” that provides it native features and device hardware accessibility. They provide a middle-of-the-road approach and have a few distinct advantages.
Hybrid applications enable cross-platform compatibility, allowing you to deploy the same codebase on multiple mobile devices. While hybrid apps may not be as optimised as fully native ones, they provide a cost-effective and efficient way to reach a broader audience with a consistent user experience.
Examples of hybrid apps include Twitter, Gmail and Evernote, which offer a mix of web and native functionality.
Pros of hybrid apps
- Quick development - hybrid apps can be created rapidly by using web technologies
- Easy maintenance - as there’s a single codebase, maintaining and updating hybrid apps is easy when compared to native apps
Cons of hybrid apps
- Performance issues - hybrid apps aren't as fast as native apps. The additional layer and the use of web technologies can lead to slower execution of certain functions.
- Limited device access - while hybrid apps can access many device features, they don’t have the same level of integrations as native apps.
Complexity of apps
While the complexity of apps is often categorised as simple or complex, we’re classifying them here based on the complexity of their build. This is because the method of development significantly influences the app's functionalities, scalability and resource requirements.
Off-the-shelf apps | Drag-and-drop apps | Custom apps | |
Development time | <1 week | 4-12 weeks | 3-12+ months |
Development cost | Free/available via subscription | $5,000-$20,000 | $25,000-$500,000 |
Development process | Pre-coded and off-the-shelf | Pre-coded; DIY drag-and-drop | From scratch or using Building Blocks |
Developer | Freelancer or No-code app builder | No-code or low-code app builder | Development agency/Builder.ai |
Example apps | Calculators, trackers, notes, surveys | Ecommerce, travel, e-learning, gym, loyalty | Fintech apps, social media app, manufacturing software, |
Off-the-shelf apps
Off-the-shelf apps are light, easy-to-use, functional apps with template-based user interfaces (UI). They're typically used for a single purpose and can be created with platforms like Microsoft's Power Apps. Calculators, trackers and surveys are good examples of them.
They also provide you with access to a dashboard, which includes top-level data and basic usage statistics.
Development time - <1 week
Development cost - Free/available via subscription
Development process - Off-the-shelf
Developer - Freelancers, no-code app builders
Examples - Calculators, trackers, cameras, surveys, notes, clocks
Drag-and-drop apps
Drag-and-drop apps allow users to add and subtract certain pre-coded features via a no-code interface. By comparison to off-the-shelf apps, they include:
- Social features – make it easy for target users to share on social media
- Activity feeds – users get real-time updates and see new and personalised content
- Ecommerce solutions – allow users to buy and sell items within the app
- In-app communications – engage users with contextual messages as they use the app
- Device features – request permission to use contact lists and location to get access to more user data; with this, you’ll be able to leverage data to run targeted campaigns and add further personalisation to your users’ experience
Drag and drop apps may also include integrations with APIs, databases and third-party services. But drag-and-drop apps aren't custom apps. They're a convenient way to get your business online, but they may lack the scalability rapidly growing businesses need.
Development time - 4-12 weeks
Development cost - $5,000 - $20,000
Development process - Pre-coded; DIY drag-and-drop
Developer - no-code app builder, low-code app builder
Examples - ecommerce, travel, e-learning, gym, salon
Custom apps
These are secure, flexible, customisable and scalable apps with advanced features and sophisticated back-end infrastructure. They're developed for unique business use cases and created by expert app development companies.
Uber is a good example of a custom ride-sharing app. It uses location data and sophisticated algorithms to pair drivers and passengers. It also includes extra security features such as “verify your trips," meaning passengers must share a code with the driver before their trip starts. Innovations like these are what make Uber a custom app.
Development time - 3-12+ months
Development cost - $50,000-$500,000
Development process - from scratch/assisted by low-code app builder
Developer - Development agency/Builder.ai
Examples - fintech software, manufacturing software, aviation software, video sharing app, social media app, LMS and CRM
App development routes: 4 main ways to create apps
There are many ways you can go about creating your app. However, the size of your business, the resources at your disposal and the purpose of your application all influence your app development route.
We’ve broken down the pros and cons of the 4 most established app creation methods below:
Freelancer | No-code app builders | Dev agency | Builder.ai | |
Effort Required | 💪🏼💪🏼💪🏼💪🏼 | 💪🏼💪🏼💪🏼 | 💪🏼💪🏼💪🏼 | 💪🏼 |
Project Timeline | ⏰⏰⏰⏰⏰ | ⏰⏰⏰ | ⏰⏰⏰⏰ | ⏰⏰⏰ |
Project Cost | 💰💰 | 💰💰💰 | 💰💰💰💰 | 💰💰💰 |
1 - Freelancer: for non-technical founders on a budget
Working with freelancers can be a great option if you’re on a shoestring budget and can work without clear timelines. Sites like Upwork and Fiverr make it easy to find freelancers with the skill set you’re looking for.
Pros
- Cost of app development is lower than working with agencies
- You can access a diverse pool of talent worldwide
Cons
- Freelancers aren't consistent, leading to potential delays and unexpected costs
- Freelancers aren't equally skilled, meaning your project may not turn out as you envisioned
- Regular communication challenges due to different time zones and language barriers lead to misunderstandings
Effort required: 💪🏼💪🏼💪🏼💪🏼
Project timeline: ⏰⏰⏰⏰⏰
Project cost: 💰💰
2 - No-code app builders: for non-technical founders creating simple apps
No-code app builders are app-building software platforms. They allow non-technical founders to quickly and cost-effectively build simple web and mobile apps and have the following up and downsides:
Pros
- No tech expertise needed to build an app, thanks to drag-and-drop interface
- Fast to build because templates are reusable and can be personalised
Cons
- You’re locked into monthly payments for your app as long as it’s in use, meaning your lifetime development costs could skyrocket
- Rigid templates mean you can’t create custom functionality to meet the unique needs of your customers
- You don’t have access to your code, so it may be challenging to migrate your app to another provider without starting completely from scratch
- You may need to complete educational courses just to use your chosen app builder
Effort required: 💪🏼💪🏼💪🏼
Project timeline: ⏰⏰⏰
Project cost: 💰💰💰
3 - Development agencies: for larger businesses creating custom apps
As a non-technical founder, using a dev agency can be a great option for making an app as they have years of experience and can create high-quality, custom software. Here's what you need to know:
Pros
- The agency’s app development teams handle technical aspectsThe code is yours to keep, meaning you have complete control over your mobile app development roadmap
- Your app is secure and scalable because it’s custom-coded, meaning you can protect customer data and meet emerging business needs
Cons
- Cost creep with development agencies is a real concern, as project expenses can skyrocket and quickly spiral beyond your original budget expectations
- Liaising with developers can be difficult and confusing, particularly if you don’t have technical skills or knowledge of how Agile development work
- You have limited visibility on your project, meaning you may not be happy with the final result
- No 2 agencies are the same. Some may prioritise speed over quality, while others may overpromise on timelines. Choosing the right agency requires thorough research.
Effort required: 💪🏼💪🏼💪🏼
Project timeline: ⏰⏰⏰⏰
Project cost: 💰💰💰💰
4 - Work with Builder.ai: best way to create apps for non-technical founders
Builder.ai is an all-in-one solution, offering a middle-ground between no-code app builders and dev agencies. On the one hand, you can create apps cost-effectively and at speed. On the other hand, you’re not restricted by templates and can create custom functionality tailored to the exact needs of your users.
This means everyone – from non-technical users founding their own startups to large enterprises looking for extra resources – can use the platform.
Pros
- No coding skills needed as humans and AI work together to assemble your app
- Guaranteed pricing means there are never any nasty surprises down the line
- Project progress is viewable in a central dashboard, meaning you’re never out of the loop on timelines and activity
- The code is yours to keep so you have total autonomy over your app development roadmap and can easily migrate to another platform (once your payment plan is complete)
- Fully managed service means you don't need to liaise with developers once you’ve shared your app idea and chosen your features
Cons
- Not for developers looking to code their apps themselves
Effort required: 💪🏼
Project timeline: ⏰⏰⏰
Project cost: 💰💰💰
Want to start your app project with us?
Book a demoSpeak with one of our product experts today.
By proceeding you agree to Builder.ai’s privacy policy and terms and conditions

App development process for non-technical founders: 7 easy steps
By now, you're aware of all the variables that might influence your app development costs and timelines, and hopefully, you've pinpointed the type, complexity and route you plan to take. Let's delve into how the app is built.
Step 1 - Planning and research
As a non-tech founder, you want to make sure that you plan ahead and establish well-defined goals that make sure your app development efforts remain focused on your overarching objectives.
During this step, you also need to assess your competitors’ app positioning, marketing and pricing strategies. This'll allow you to reverse-engineer their strengths, take advantage of their weaknesses and differentiate your app’s market positioning.
Performing an app competitive analysis is key to effectively positioning your app and building features that allow you to win market share.
Step 2 - Finalise your app features
Similar to your goals, the app features you need should align closely with your target users and the actions you want them to take.
Let’s say you want to create an ecommerce store, for example. In this case, you need features like product catalogues, order management systems, inventory management, payment gateways and returns and refunds.
But for a social media app none of these features would be relevant. Instead, you need features like photo and video uploading, personalised feeds, direct messaging, push notifications and editing tools.
At Builder.ai, this process is handled by Natasha, our AI product manager. She automatically pulls the features required in your app.
Step 3 - Map out app user journeys
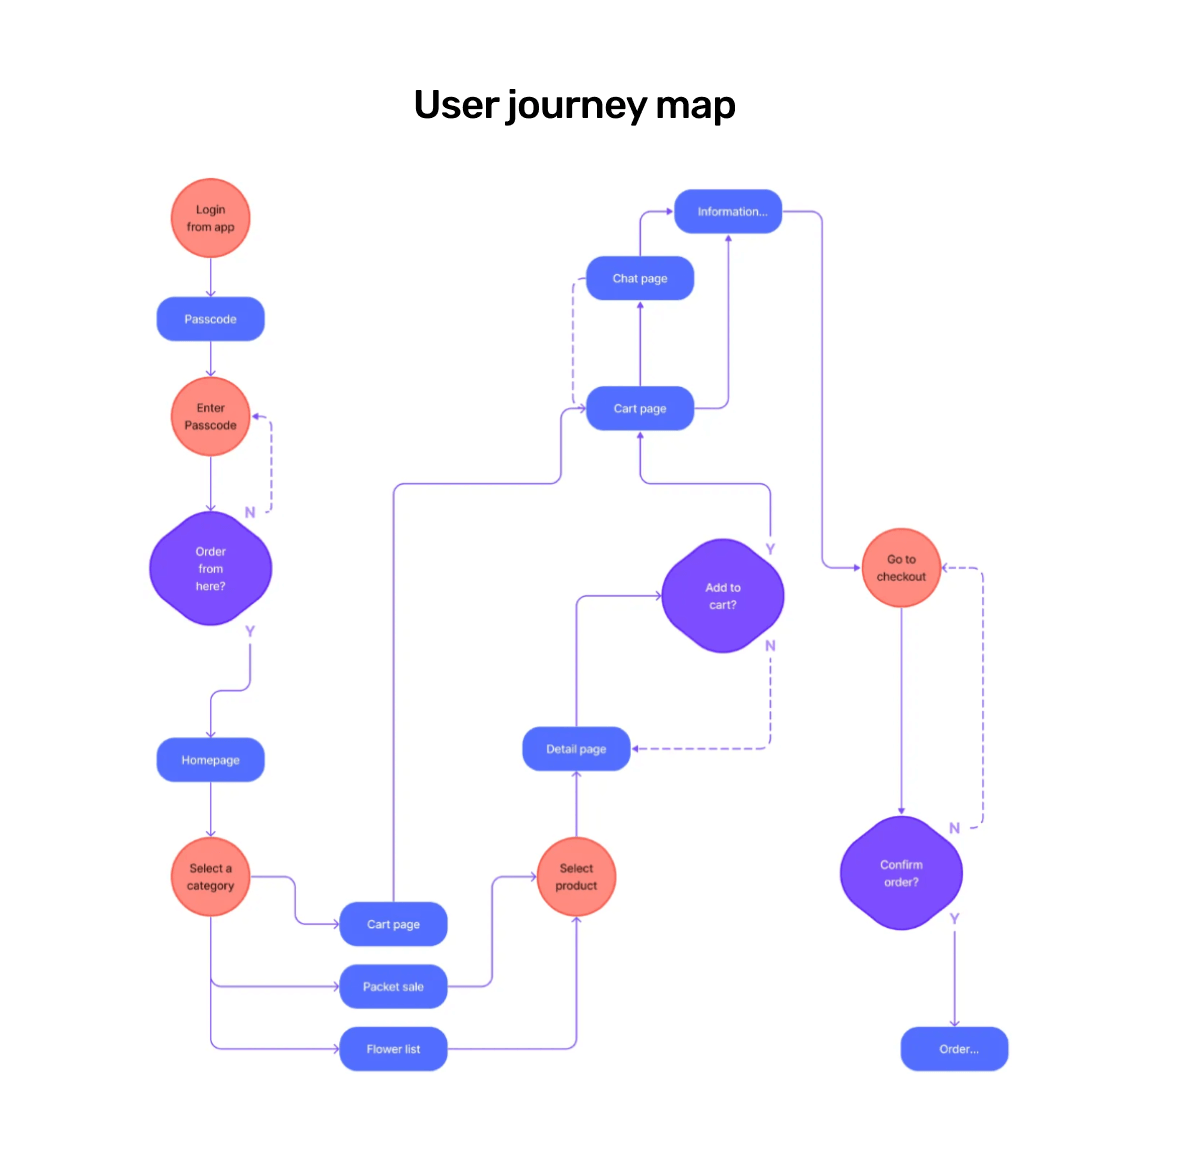
App user journeys outline the series of steps users take while interacting with your app to complete a specific task. They help you examine the behaviour a user might exhibit while moving through your app and, at the same time, identify bottlenecks and pain points in achieving a desired goal.
Think of user journeys as high-level requirements that capture what an app needs to do. For instance, let’s say you want to create a ride-sharing app. Here, you’ll map out the complete journey a user will take in your app, including logging in, booking a ride, tracking its arrivals, ending the trip, completing payments and rating the driver.
By making user journeys as smooth as possible, you have a far greater chance of establishing a relationship with app users and building loyalty.
You must map out user journeys before entering into the design stage. Only after creating user journey maps can you start your actual app development process.
At Builder.ai, this process is also handled by Natasha, our AI product manager. She automatically creates the journeys required in your app.
Step 4- Create an app design

Now that you've locked down your user journeys, it’s time to start the app design phase. It’s divided into 3 stages:
Wireframes
The natural starting point of the mobile app design process is to create wireframes. Essentially, these are skeletal blueprints of your app designs, outlining the layout, structure and functionality of your app’s screen and features.
But as they progress and elements are added, they become mockups.
Mockups

An app mockup is a visual representation of your app's design. It's essentially a screenshot of your app's layout, user interface and overall design elements, but doesn't have any functionality.
They’re different from wireframes as they contain more stylistic UI details and show how your app will look after production.
Once you have this, you can move on to the prototyping stage.
Prototypes
An app prototype is an interactive mockup that has clickable features and looks similar to the final product.
It’s one step ahead of the app mockup that combines both the UI and UX elements of your app.
Where mockups give you the “look” of the final product, prototypes allow you to experience and get the “feel” of the final product.
Prototypes help you keep development costs to a minimum by avoiding mistakes early on in the app-making process.
At Builder.ai, we provide you free instant prototype of your app, helping you to see how your app will work in real-time or you can raise capital.
Step 5 - Coding stage
This is the stage where the actual app gets built. If you still haven’t finalised who will build your app, this is the stage where you have to take the plunge.
Whoever you choose to build your app, be it a freelancer, no-code app builder, dev agency or Builder.ai, make sure your app stays true to your original idea.
At Builder.ai, we understand that most app projects fail when stakeholders aren’t aligned. That’s why we assign a dedicated product manager to your project to manage your app build.
They’re known as Productologists, who ensure app designers and developers all pull in the same direction throughout the whole app building process.
With us you also get Builder Home, a real-time project dashboard, where you can collaborate with your Productologist, providing feedback on features, bugs and app releases. Here, you’ll also see any actions you need to complete, as well as all of the calls and meeting notes from your project to date.
Step 6 - Test your MVP
A minimum viable product (MVP) is a hard-coded but unfinished version of your app, and is the product you typically launch on mobile app stores for early adopters. But before your app goes live, it needs to be tested.
There are two key approaches to mobile app testing you should be aware of, and combining both of them is likely to yield the best results:
- Automated testing - uses scripts and test automation tools to execute test cases; it can perform repetitive and complex tests much faster than manual testing, allowing for quicker test cycles and more comprehensive coverage
- Manual testing - relies on the tester's creativity, intuition and domain knowledge to explore the app, find defects and assess its usability and overall user experience
To ensure that your app is as user-friendly as possible, our team of experts perform a wide range of tests in the testing process, including:
- Functional tests - examines whether your app performs its intended purposes
- Performance tests - assesses your app’s responsiveness, speed and stability under various conditions
- Compatibility tests - evaluates how well you app works in diverse environments, such as different screen sizes and operating systems
- Usability tests - evaluates navigation, content and overall design to decide how intuitive and user-friendly your app is
- Security tests - identifies vulnerabilities in your app’s security features, including data protection, encryption and authentication
- Compliance tests - ensures that you adhere to industry-specific regulations such as GDPR and HIPAA
Ultimately, with this strategic approach to the testing process, we make sure that you don’t make sweeping changes to your app based only on feedback from rogue users. And by constantly repeating the process long after your app launches on app stores, you’ll ensure long-term high performance for your app.
Step 7 - Launch your app
Making your app available to download via mobile app stores is the culmination of all your hard work and marks the end of the app development process.
If you’ve created an Android app, you should upload your apps to Google Play Store and the Amazon App Store. Meanwhile, if you’ve created an iOS app, you should submit it to the Apple App Store.
Whatever your chosen platform, App Store Optimisation (ASO) will ensure your app ranks above your competitors.
Remember to engage with your user base and keep improving app ratings and reviews to propel you to position #1 in the App Store rankings.
Step 8 - Maintain your app
You can’t just set your app live, forget about it and expect it to drive the results your business needs.
Nasty bugs can crop up and breaches can happen, especially if you don’t update your software. With an app maintenance service, you can avoid this. Plus, app stores require you to keep updating your app from time to time.
Constant infrastructure monitoring, for example, ensures that fixes happen before you – or more importantly, your users – notice. This means your app’s revenue numbers continue to skyrocket while customers learn to trust your brand.
When you create an app with Builder.ai, you get free maintenance for the first year of your app project. Studio One includes ongoing technical support, security patches and bug fixes as well as 24/7 uptime and performance monitoring.
Tips to lead app development process for non-technical founders
1 - Stay engaged throughout the process
As a non-technical founder, it’s crucial for you to stay actively involved at every stage of development. Don’t just approve milestones; take the time to understand each step.
Ask your team to explain each phase – like front-end and backend development and Quality Assurance – in simple terms, so you’re always in the loop.
Here’s a wild idea; become head of QA. This way you can do regular check-ins that help you stay updated on progress and catch any potential issues early. During these meetings, focus on both the function and feel of your app and don’t hesitate to get hands-on with prototypes.
2 - Prioritise user experience
While building an app, technology isn’t the most important thing – putting the user first is. As a founder, you need to understand what your users want better than anyone else.
Instead of adding more and more features, focus on the value proposition of your app and then make your app’s core functions intuitive and seamless to use.
One of the best ways to do this is through competitor analysis. Review similar apps in your field to understand user expectations and bring these insights to your development team.
3 - Set realistic budget and timelines
Setting realistic expectations in terms of budget and timeline is one of the most important tasks you need to undertake.
One of the ways to do this is by developing in phases. Start by developing your MVP that focuses on the essential features and provides users with immediate value.
You can save any non-essential features for later phases to help reduce budget risk and accelerate your time to market.
Additionally, it’s also wise to plan for a budget contingency and assign a certain percentage (15–20%) of your total budget for unexpected costs.
4 - Create a marketing strategy early
Starting your app marketing efforts well before launch is important to ensure a strong user base from the start.
Simply begin by establishing your social media presence early. You can use these channels to share development updates, behind-the-scenes content and even opportunities for early sign-ups to build excitement.
Meanwhile, build a list of early adopters or influencers who can provide feedback and help attract a larger audience through word-of-mouth promotion.
5 - Work with the best
For non-technical founders, it’s essential to focus on strengths and bring in skilled developers to handle the technical work. Rather than trying to manage tasks outside your expertise, do what you do best – whether that’s sales, marketing or operations.
Hiring top talent or a trusted development team allows you to stay focused on growing your business while making sure the technical aspects of your app are expertly managed. This approach not only frees up your time but also empowers app developers to work effectively and with confidence.
Conclusion
In business, lacking technical skills doesn’t have to hold you back from creating a successful app. Remember, you can always get technical help from outside to build it for you.
By focusing on your strengths, understanding the basics of app development and working with the best team, you can bring your vision to life without writing a single line of code.
This is where Builder.ai can help. With us, you get:
✅ Years of expertise - strong portfolio in multiple industries and app types
✅ Transparent costs upfront - so you know exactly what you’re paying for, with no surprises
✅ Keep your code - ensuring control over your app even after launch
✅ 1-year of app maintenance - that keeps your app secure and running smoothly
If this sounds good, hit the banner below to kick-start your app project today! 👇
Want to start your app project with us?
Book a demoSpeak with one of our product experts today.
By proceeding you agree to Builder.ai’s privacy policy and terms and conditions

Gaurav is the SEO Content Writer at Builder.ai. Being an Engineer and Marketing MBA, he has a knack for converting technical jargon into marketing content. He has 8+ years of experience creating content and designing marketing campaigns that drive organic growth for B2B companies and tech startups.







 Facebook
 X
X LinkedIn
 YouTube
 Instagram
 RSS
RSS
