Let’s face it:
The demand for software is skyrocketing. A recent report shows that large businesses today deploy an average of 175 software systems to run efficiently.
So how do you keep up with this high demand? You’ve got 3 options: buy it off the shelf, build software in-house or partner with a software development platform.
But let me be clear. To build software from scratch, you need to know the ins and outs of the software development process.
This knowledge isn’t just about keeping tabs on your tech team or development partner; it’s about making sure that every feature of your software project stays aligned with your business objectives and meets the highest quality standards before it gets into the hands of users.
In this guide, we’ll break down what each stage of software development involves, then cover the 3 best software development processes. Plus, we’ll also provide you with a new and improved option that covers all the bases.
Let’s dive in 👇
What is the Software Development Process (SDP)?
From idea to launch, software goes through a defined step-by-step process. Collectively, the sequence of this path is known as the software development process (SDP) or the software development life cycle (SDLC). Simply put, it's a path to make software that meets specific business needs.
The goal of the software development process is to produce high-quality, reliable software that aligns with user expectations and business objectives.
Importance of a software development process
Imagine you’re in a blazing hot desert. Would you hope to stumble on to an oasis in the middle of nowhere or rather have a map that takes you there?
Similarly, you need a structured software development process, because following it helps you get to a successful end result.
But the SDP is more than just something to keep things organised. It also boosts communication and collaboration within your development team and project stakeholders. By setting clear roles and defining communication channels, everyone knows what’s expected of them.
SDP also formalises Quality Assurance by setting up processes to handle bugs and errors. It makes sure the software not only meets the requirements but is also robust and scalable.
Additionally, a well-defined process streamlines development activities, making sure that the final product is delivered on time and within budget.
7 steps of the software development process
Typically, each step of the process creates an output that works as the input for the next step. This is repeated until you’ve built your software completely.
That being said, software development is never “completed.” Even after you launch your software, you need to keep improving it so that it continues to meet your users’ expectations.
1 - Planning
The planning stage is the first step in creating software. This is the stage that makes sure your development is starting off on the right foot.
It’s important that you include the most experienced team members, along with input from customers, sales, marketing and industry experts, to lay the groundwork.
You then use all this information to check if the project is feasible in terms of money, legality, operations, technology and time.
The main aim here is to figure out the best way to carry out the project while avoiding any major problems.
To get a better handle on this stage, let's look at the key questions you need to answer:
- Make a business case: why is the project needed?
- Define scope: what does the project cover and what won’t?
- Set goals and objectives: what do you want the project to accomplish?
- Outline deliverables: what does the project need to deliver?
- Create a schedule: what is the projected timeline?
- Estimate cost: what’s the estimated cost that’s both flexible and fair?
- Assign tasks: which team is responsible for what part of the project?
- Assess risk: what could go wrong and how to handle it if it does?
Ideally, at the end of the planning stage, you should create a high-level blueprint that outlines what’s being built, why you’re building it and how it’ll come together.
2 - Gather project requirements
The requirements-gathering stage is all about diving deep into what your end users actually need from the software.
This stage is one of the most crucial stages because it sets the direction for the entire project. According to data, 48% of software defects are due to errors introduced during the requirement analysis.
Here’s how it typically unfolds 👇
Engage with stakeholders
This involves interacting with the people who'll use the software or be affected by it. This could include future users, project sponsors and other stakeholders. The goal is to get a clear picture of their needs and expectations.
Detail the requirements
During your interactions, collect both:
- Functional requirements – what the software should do, like processing payments and registering users
- Non-functional requirements – how the software should perform, like speed, reliability and user-friendliness under different conditions
Resource planning
Once you have a clear understanding of the requirements, you can start planning the resources needed to make it happen. This includes deciding how many project managers, software engineers and designers are needed.
It also involves selecting the right tools and technologies that best meet your project's requirements.
Once you’ve gathered all the requirements, start breaking down high-level tasks into smaller, more actionable steps. You can do that by mapping user journeys and creating relevant user stories and acceptance criteria.
3 - Design and prototyping
With the exact requirements in place, it’s time to design your software. This step isn't just about the software aesthetics but also how it’ll work and what the user flow will look like.
The natural starting point of the software design process is to create wireframes. Essentially, these are the blueprints for your software.
Creating wireframes helps you optimise the flow of your software, ensuring the user experience (UX) is up to scratch and it's easy for your users to take desired actions. Your designers can create wireframes using tools like Adobe and Figma to show these interactions.
This is also the stage to spot any issues or missing features because it's easier to make changes now rather than after development has started.
This is why creating a software prototype is really useful here. It’s a basic version of the software that helps your designers validate the idea and get feedback from stakeholders before any hard coding takes place.
4 - Coding
With designs onboard, it’s time to kick off the coding phase. This is the stage where the actual building of the software happens.
The coding stage is often seen as the most risky of the software development process. This is because it’s in the coding stage where most of the security vulnerabilities are introduced. According to Gartner Security, 90% of all security vulnerabilities are located inside the code.
The main aim here is to stick to the plan and build clean and efficient code.
The coding process is split into 2 main parts: front-end development and backend development.
- Front-end development - this is about creating the parts of the software that your users will see and interact with. Front-end is built using HTML, CSS and JavaScript.
- Backend development - this part focuses on the behind-the-scenes functions of the software. It involves working on the server and database to make sure everything communicates well.
The coding phase is easily the longest in the software development life cycle and requires a lot of testing to make sure everything works as it should.
5 - Testing
At this stage, the software is deployed in a testing environment where it undergoes a thorough examination by the testing team. As developers are writing code, your testers should be simultaneously testing code and tracking bugs to fix them.
The primary goal of software testing is to make sure the software is free of defects and performs as expected under various conditions before it is released to end users.
The key frameworks you should use in the testing phase include:
- Functional testing - this tests the individual functions or features of the software to verify they function as intended
- Usability testing - this involves real users interacting with the software to perform specific tasks
- Performance testing - this type of testing evaluates the stability and resource usage of software to make sure it can handle unexpected loads
- Security testing - this focuses on identifying vulnerabilities and potential security threats like unauthorised access and data breaches
6 - Deployment
With the heavy lifting of coding and testing out of the way, it’s time to move your software from the development environment and set it up on servers and devices.
Typically, deployment happens in stages:
- Alpha release - here a small group of users first try out the software and give feedback
- Beta release - after making improvements based on the alpha feedback, the software is given to a larger group of users
At this stage, having great software alone might not be enough. What you need is an effective marketing strategy to make sure that your software gets the attention it deserves.
7 - Maintenance
Remember when I said the software development lifecycle is never complete? It’s a cycle. It doesn't just end after launching your software. Instead, it shifts into the maintenance stage.
This is because bugs can crop up and breaches can happen. Plus, user requirements are always evolving and you need to keep updating your software to keep it relevant.
There are many types of software maintenance your software may need:
- Corrective maintenance - this is all about fixing bugs or issues that pop up
- Adaptive maintenance - this type of maintenance makes sure the software adapts to work with new systems or hardware
- Perfective maintenance - when users want new features or functions, this maintenance adds those in
- Preventive maintenance - this proactive maintenance prevents problems by fixing things before they go wrong
What are the different software development methodologies?
There are several software development methodologies that have been developed over the years to handle complex projects. But which one should you go with?
To help you decide, below are the top 3 best software development methodology frameworks 👇
1 - Waterfall software development
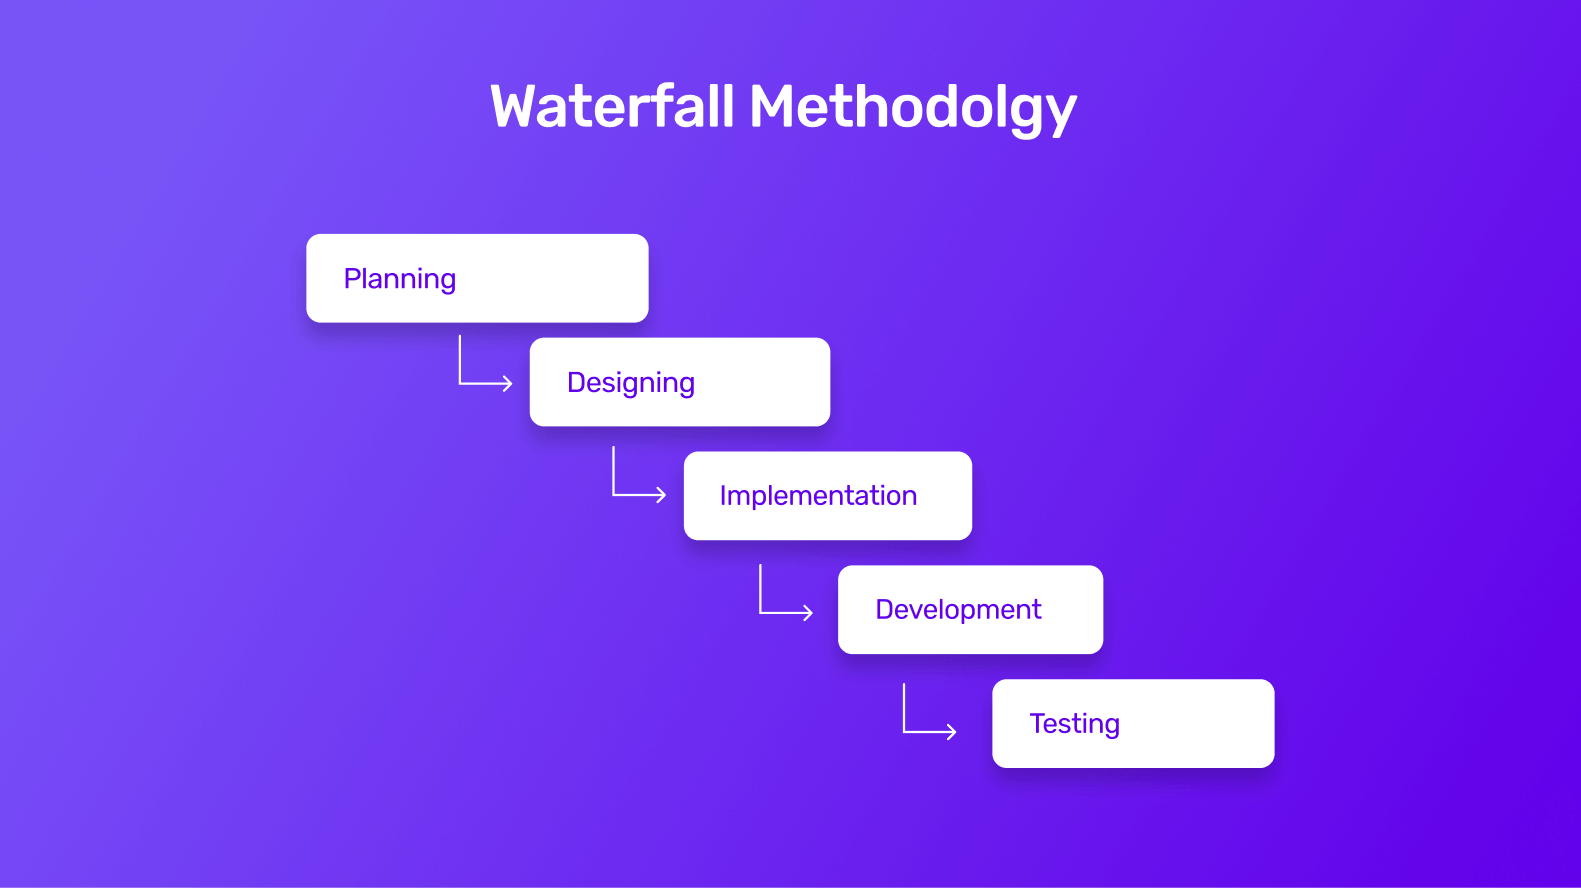
The waterfall model is one of the oldest ways to develop software and is often called the classic life cycle model.
Picture it like walking down a staircase — each step must be taken one at a time. These steps include planning, designing, building, testing and maintaining the software, and each one must be completed before moving on to the next.
It's mostly a straight path from start to finish, and the model affords very little flexibility.
The Waterfall model is great for projects where everything about the project is clear from the start. Since the process is rigid, it's not easy to make big changes once the project has started. And because of this, you might end up going the wrong path.
Pros
- Clear structure
- Easy to manage
Cons
- Less adaptable
- Delayed testing
- Errors take time to fix
2 - Agile software development

Agile is a super-flexible way to develop software that focuses on teamwork, getting feedback from users and making quick, small updates.
Unlike the Waterfall model, Agile breaks the project into little pieces, Sprints, which makes it easy to change things along the way. This is perfect for projects where what the user needs might change over time.
What makes Agile development so effective is that you don't need to have everything figured out from the start. You can begin with a basic idea and adjust as you go, based on what users say and what you learn.
This means you can develop parts of the software step-by-step, test them out and see if they work well before moving on.
For instance, let’s say you’re building software that has 50 features. Rather than building all the features in one go, focus on the five highest priorities in Sprint 1. This way you can gather feedback on the first set and then develop the next five in Sprint 2.
Agile is very popular, especially with software development companies, because it helps avoid mistakes and adapts easily. In fact, more than 61% of projects use Agile because it's so effective.
However, Agile software development needs a flexible budget and timeline. If you're tight on money or time, it might not be the best choice. It's great for projects that need regular updates and can handle changes as they come.
Some common Agile methodologies include Scrum, Kanban and Lean.
Pros
- Highly flexible
- Continuous improvement
Cons
- Requires close collaboration
- High costs and unpredictable timelines
3 - Incremental software development
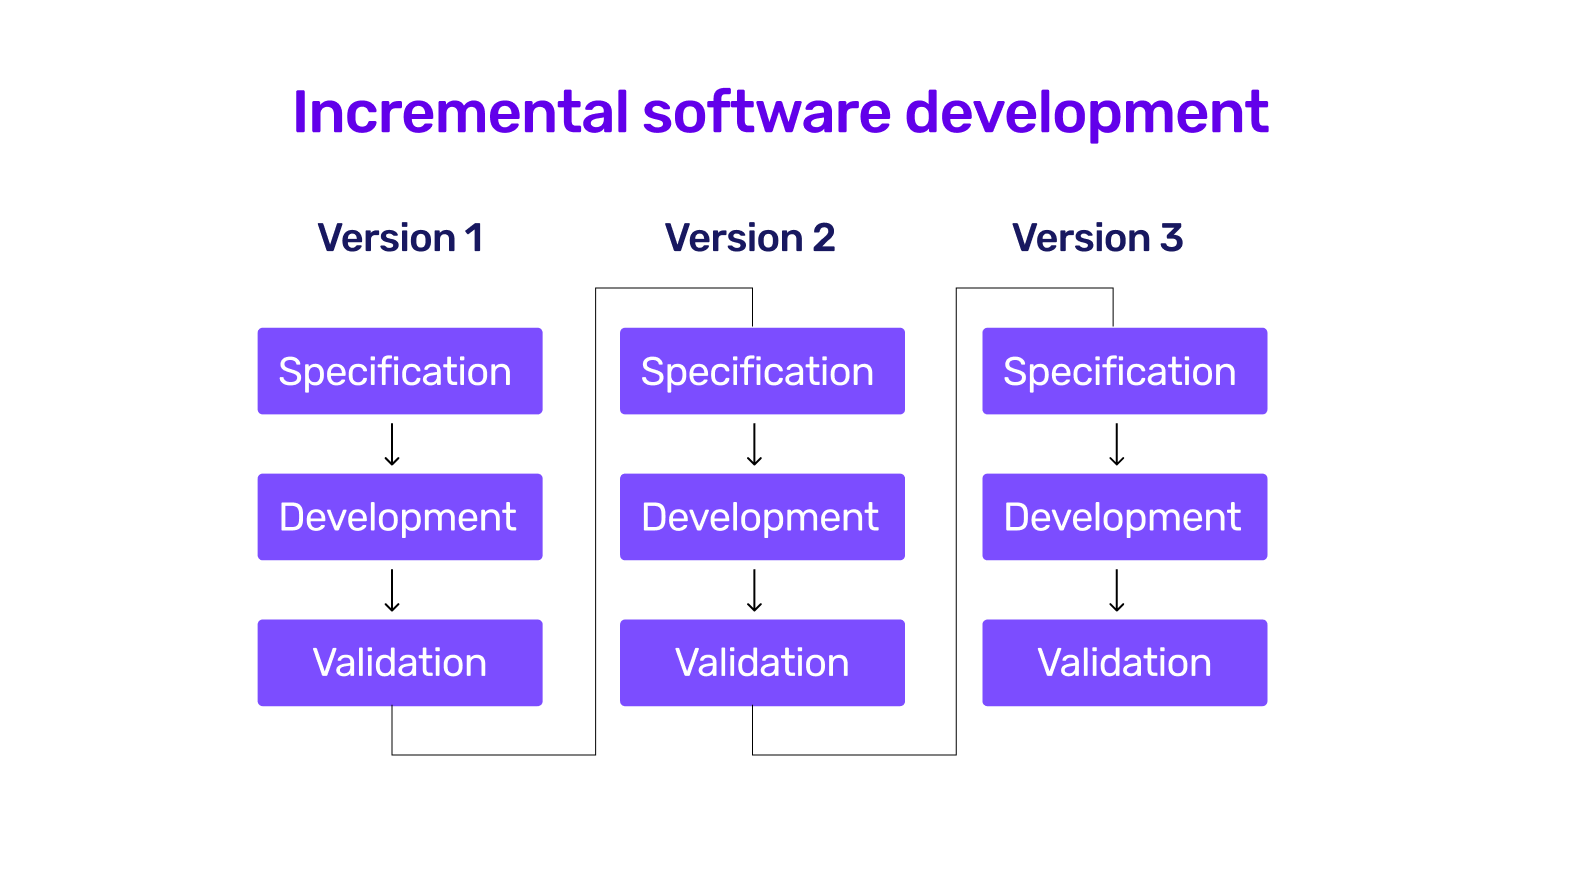
The incremental model is a smarter way to handle software development by breaking the project into smaller versions. Each version is developed and tested thoroughly until the entire product is complete.
A good example of this is a Minimal Viable Product (MVP), where you start with just the core features and enhance the software based on user feedback.
The incremental model works as somewhat of a middle ground between the rigid structure of Waterfall and the high flexibility of Agile. It offers more structure than Agile but is more adaptable than Waterfall.
This method allows for parts of the product to be delivered gradually and comes in handy especially when you need to get something to market quickly.
Pros
- Clear schedule
- Easy to manage
Cons
- Delays in full functionality
- Integration challenges in newer versions
Want to start your app project with us?
Book a demoSpeak with one of our product experts today.
By proceeding you agree to Builder.ai’s privacy policy and terms and conditions

Builder.ai’s new-and-improved software development process
By now, you know that working on software takes time and effort from your internal development teams, which are already busy with other tasks.
But don’t worry.
In the intro, we promised you a solution that'd simplify your software development.
So here it is — Builder.ai, the composable software platform. With Builder.ai, you can build software that's tailored specifically to the unique needs of your business without writing a single line of code.
How does this happen?
Around 80% of all software is made up of around 650+ features. We package each basic feature as a reusable Lego-like block. Explain your idea to our AI companion, Natasha, and she uses these blocks to rapidly create an outline of your software.
The work is completed faster and cheaper because Natasha handles all the repetitive coding. Then it’s off to our software design team and software developers. They personalise it and create any bespoke elements you need.
To build your software, simply head over to Builder Studio. The Builder Studio platform has been built with user convenience in mind and intuitively guides you through the software creation process.
Here’s how you can build your custom software in no time 👇
1 - Discuss your ideas with Natasha
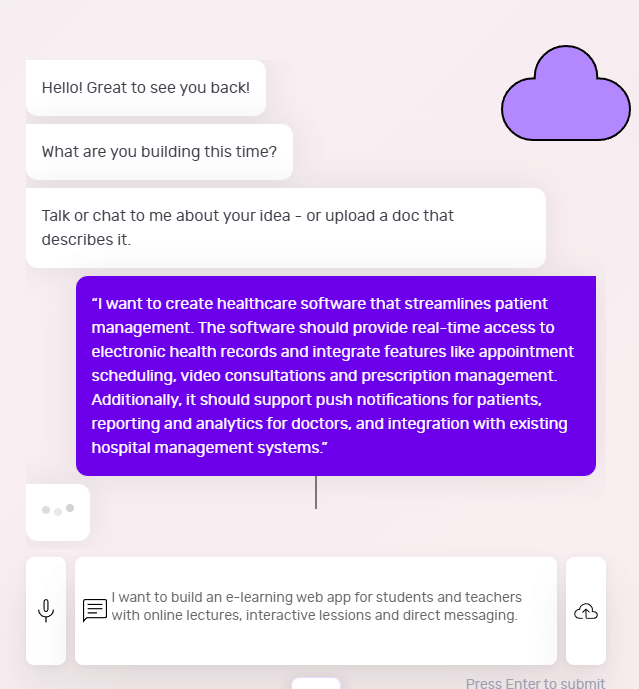
On Builder Studio, you’re welcomed by Natasha. You can express your software ideas to Natasha via voice, text or uploading a PDF or doc file.
Before you chat with her, have a checklist of software features and be as descriptive as possible about your software idea. The more detailed information you give to Natasha, the better her suggestions will be.
For instance, if you’re building healthcare software, your prompt could look like this:
“I want to create healthcare software that streamlines patient management. The software should provide real-time access to electronic health records and integrate features like appointment scheduling, video consultations and prescription management.
“Additionally, it should support push notifications for patients, reporting and analytics for doctors, and integration with existing hospital management systems.”
Based on your prompt, Natasha will ask you some supporting questions and you simply need to answer them based on your requirements.
2 - Choose a base
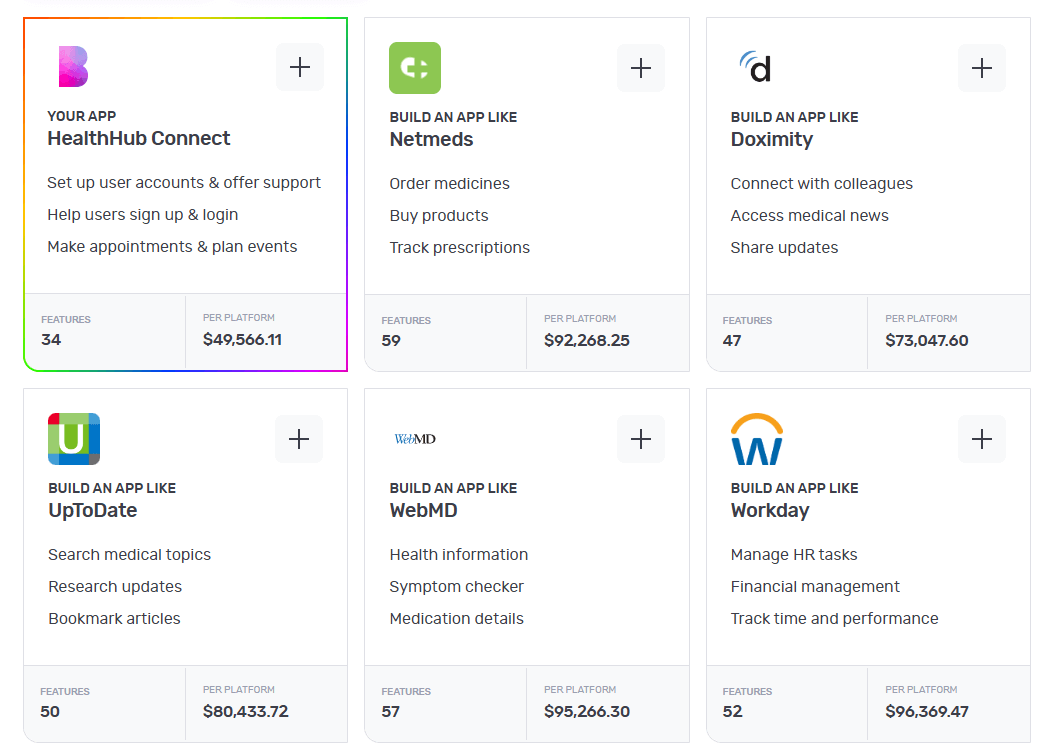
Once Natasha has your requirements, she’ll create a custom framework for your software based on everything you tell her. She'll also suggest some pre-built bases she thinks are best suited for your software.
Continuing from the above healthcare example, once you tell her to create a healthcare software she’ll suggest a custom base similar to Netmeds and share any matching core bases as well.
You can choose up to 3 you feel are related to your software idea by simply clicking the ‘+’ icon. These selections make it easier for us to understand the features your software needs. When you’re ready, click 'Next'.
3 - Make it mine
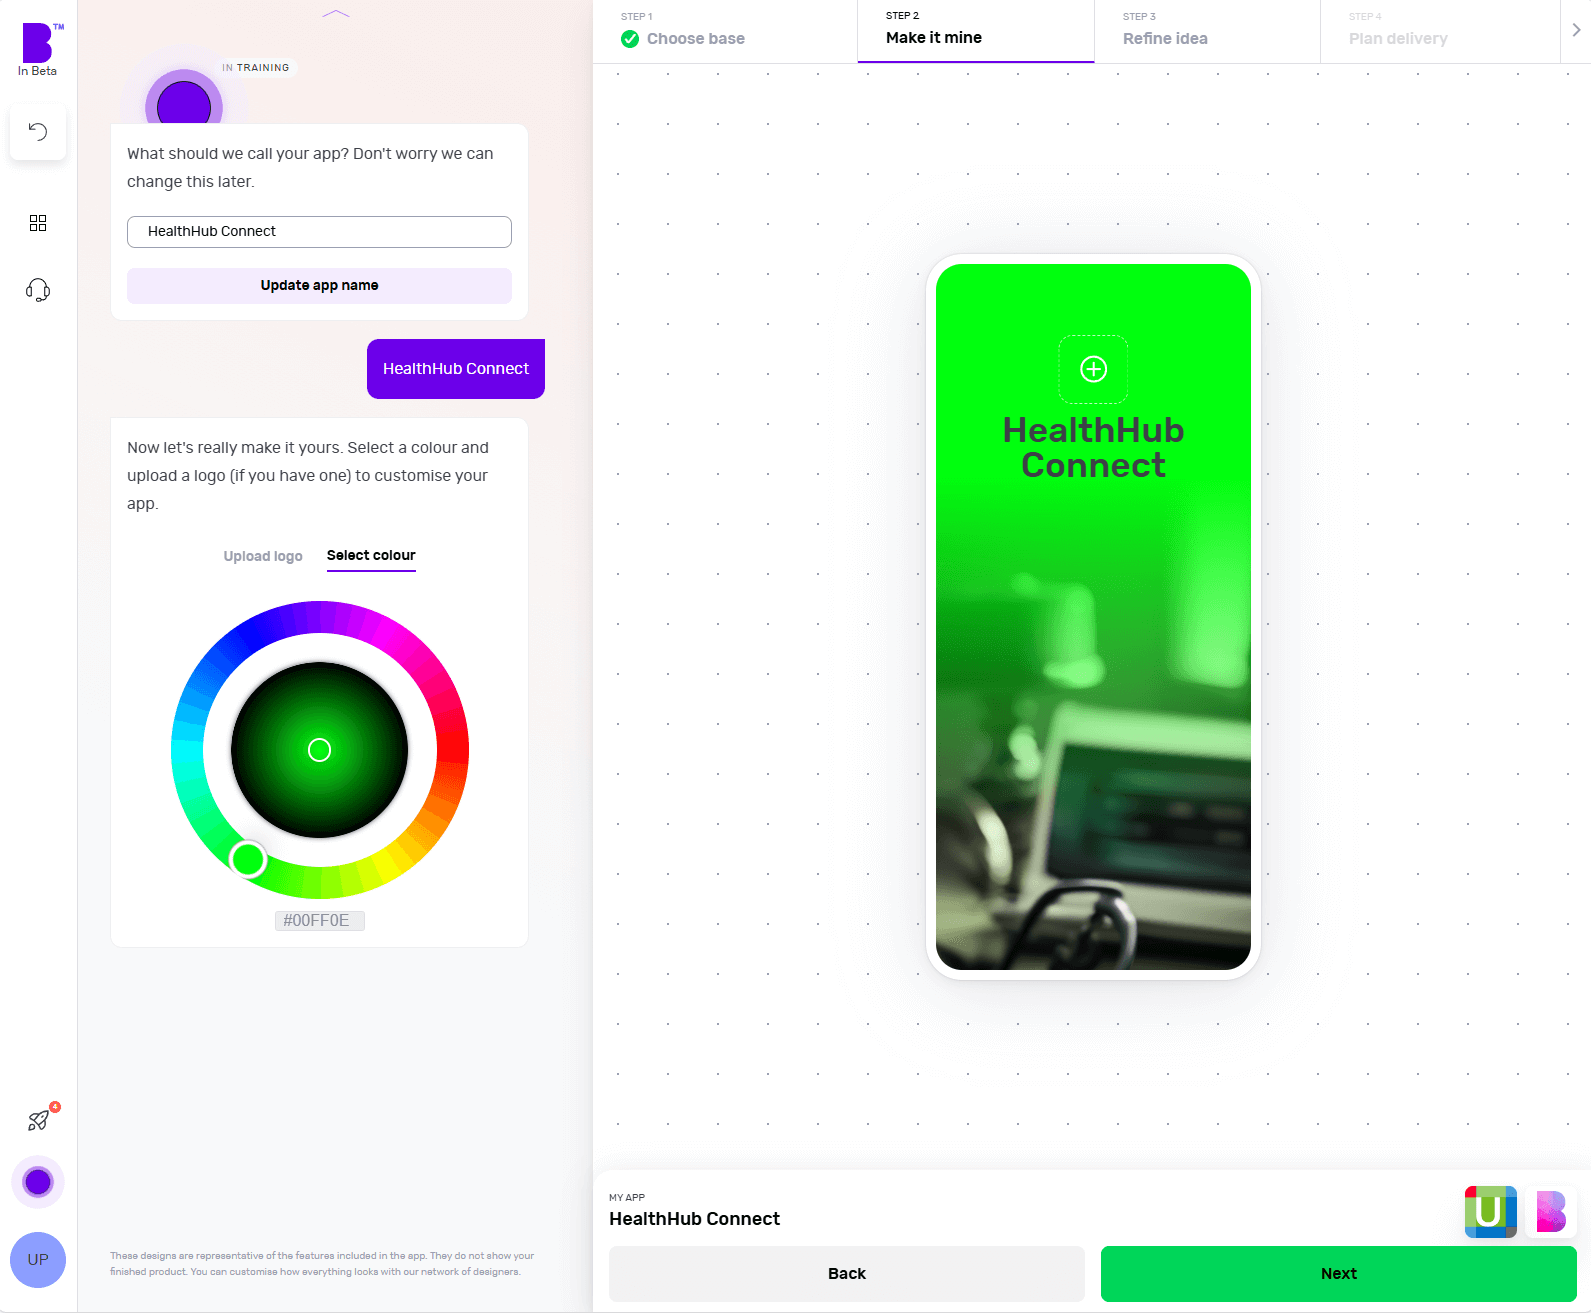
The 'Make it mine' step aligns your software with the identity of your brand. In this step, you provide your software’s name, choose the colour scheme using the colour wheel and upload the logo of your brand.
Once you’ve personalised your software’s name, colour and logo, you can click ‘Next’.
4 - Refine your software idea

Now comes the fun bit.
In the 'Refine idea' stage, you can review and customise your software journeys and features and also create an instant prototype of your software.
Journeys
In only a matter of seconds, Natasha createssoftware user journeys with corresponding features.
Go through these journeys carefully and see if your software needs additional journeys. For instance, check if you want to add journeys for tracking logistics, customised order status or any other relevant journey.
To add journeys, click on 'See more suggestions'. Doing so will open the list of pre-built journeys. You can browse the list and select the journeys you’re missing. You can also add custom journeys by clicking on 'Add custom journey'.
Features
By clicking on individual journeys, you can see the feature list each journey contains. Doing so will open the features list each journey contains. You can scroll through the features list and check if a journey contains non-essential features or if you want to add extra features.
To remove a non-essential feature, you can hover over the feature and click ‘Remove’. This way you can manage project costs. If you’re not sure what features to remove, you can click on an individual feature and check the label at the top. We highly recommend keeping the ‘Essential Features’.
In case you want to add more features, you can simply click the ‘+’ button. Here you can go through different categories or use the search bar to look for missing functionality. In case you don’t find the feature you’re looking for, you can also add a custom feature by clicking on 'Add custom feature'.
Instant prototype and user flow
Once you’re happy with the journeys and features of your software, you can create a prototype by clicking on 'Preview your app' in the top-right corner.
Sign up and Natasha will create a working prototype of your software. You can click on the screen at different areas to progress through the journey.
You can also see theuser flow by clicking on the 'Flow mode' at the top of the screen to see how users will interact and navigate within your software.
If you need extra help, Natasha is on hand to help and you can interact with her at any time by clicking on 'Speak to Natasha'.
She’ll provide you with suggestions and help you find features or journeys from the library. Or you can click on 'Book a demo' to talk to our product managers who’ll guide you through your software development journey.
Click on 'Save & Continue' to go to the next step and also to save your progress or it might get lost.
5 - Plan delivery
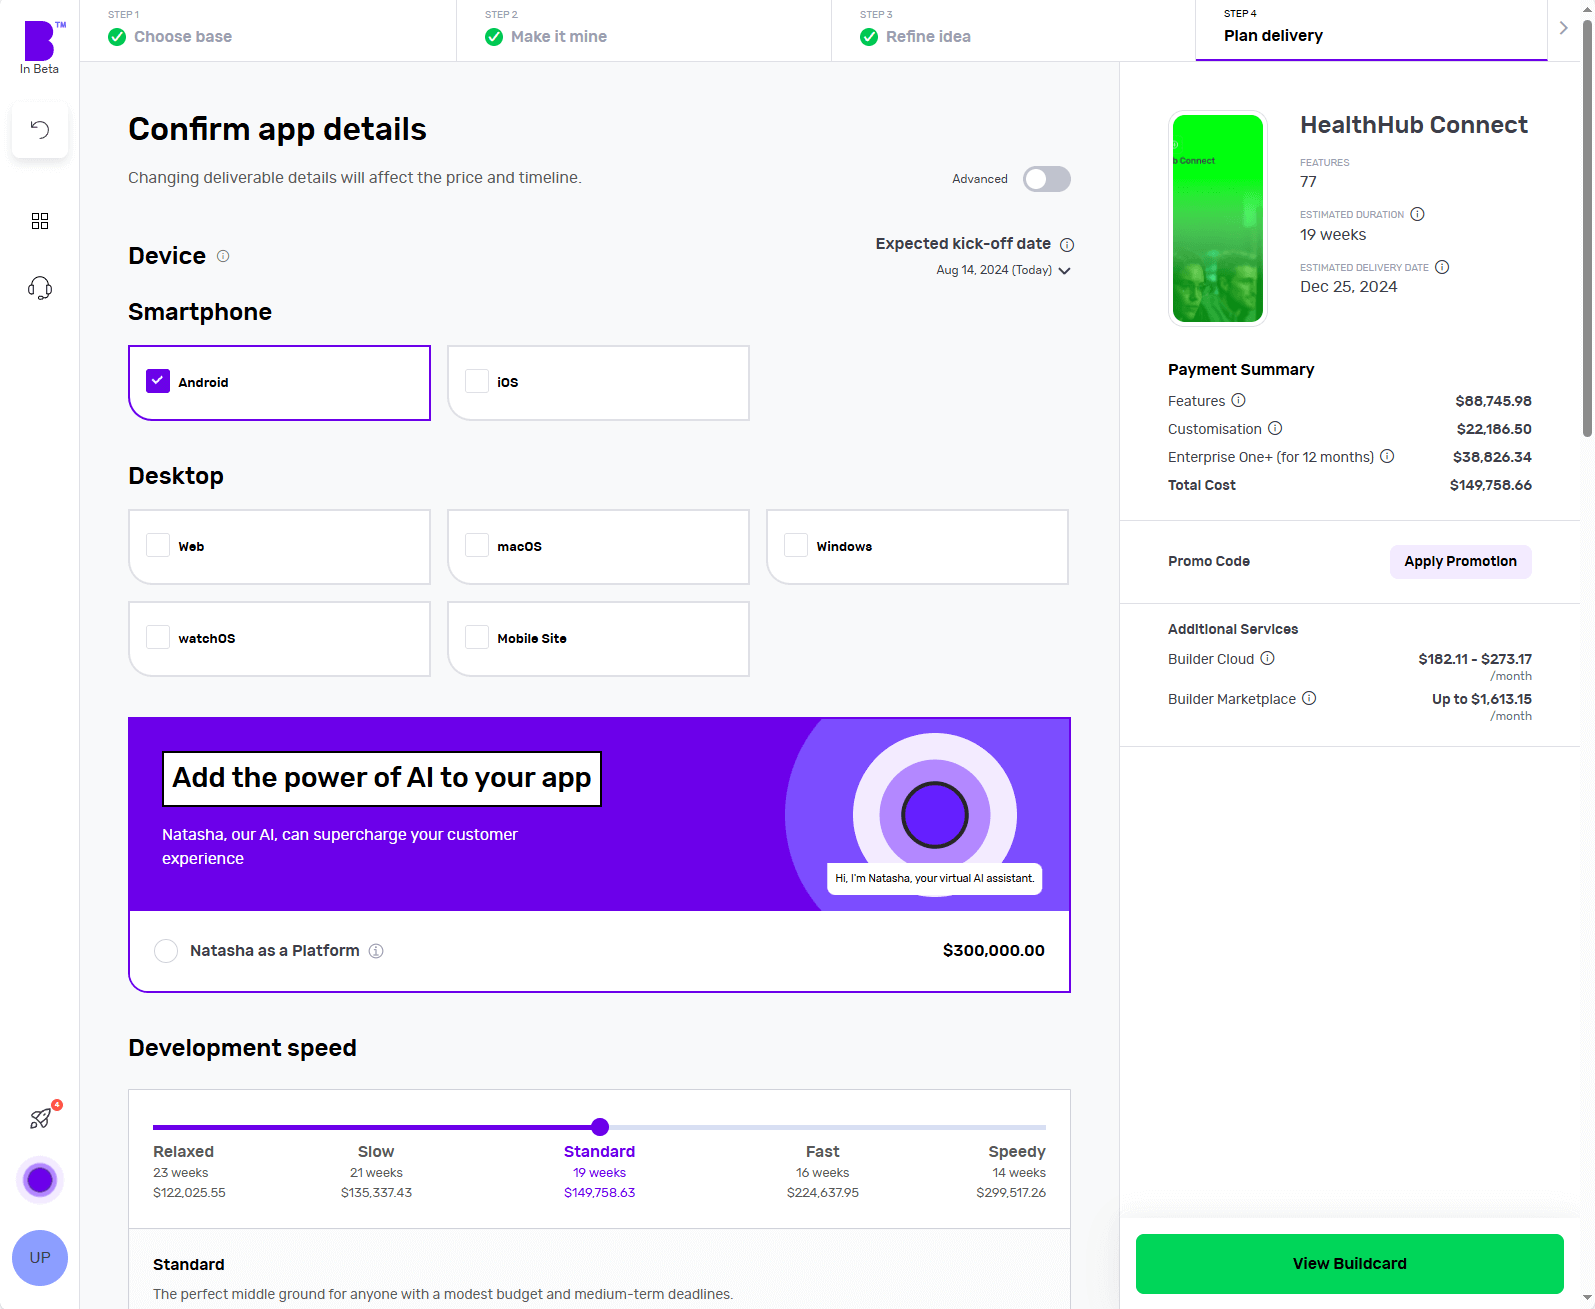
It’s time to choose the platforms you want your software to be available on. Want a desktop app? Click Windows or macOS. Fancy a mobile app? Hit Android or iOS. Not sure about the platform? Choose multiple platforms and see how they change the price and timelines.
Next, you can choose to add Natasha to your platform to supercharge the customer experience of your software. Natasha uses Large Language Models (LLMs) to engage your customers in fluid, human-like conversations.
In the development speed section, you can change the speed of each development phase according to your needs. The faster the development speed, the higher the costs and vice versa.
Next up is Design. If you have your software designs ready, you can save on your costs by clicking 'You have design' and we’ll reduce your costs accordingly. You can share your design files (preferably in Figma) and our designers will upload them, so you can kick them off straight away.
If not, you can choose the 'We do your designs' option. Here, you simply need to add your brand assets and we'll do everything from storyboarding to fully designed screens.
Now it’s time to plan the phases of your project. Here you get 3 options:
- Clickable prototype: you’ll get a visual representation of your software to test with users
- Basic build: you’ll get an MVP (Minimum viable product) – a hard-coded but simplified version of your idea; this allows you to collect feedback and iterate before you do a full build
- Full Build: you’ll get market-ready software, including a kick-off with our product team and review sessions
After that, you need to select your support plans. With 'Full Build' you get one year of Studio One support included free of charge.
Once you’ve planned your delivery, click on 'View Buildcard'.
6 - Review Buildcard
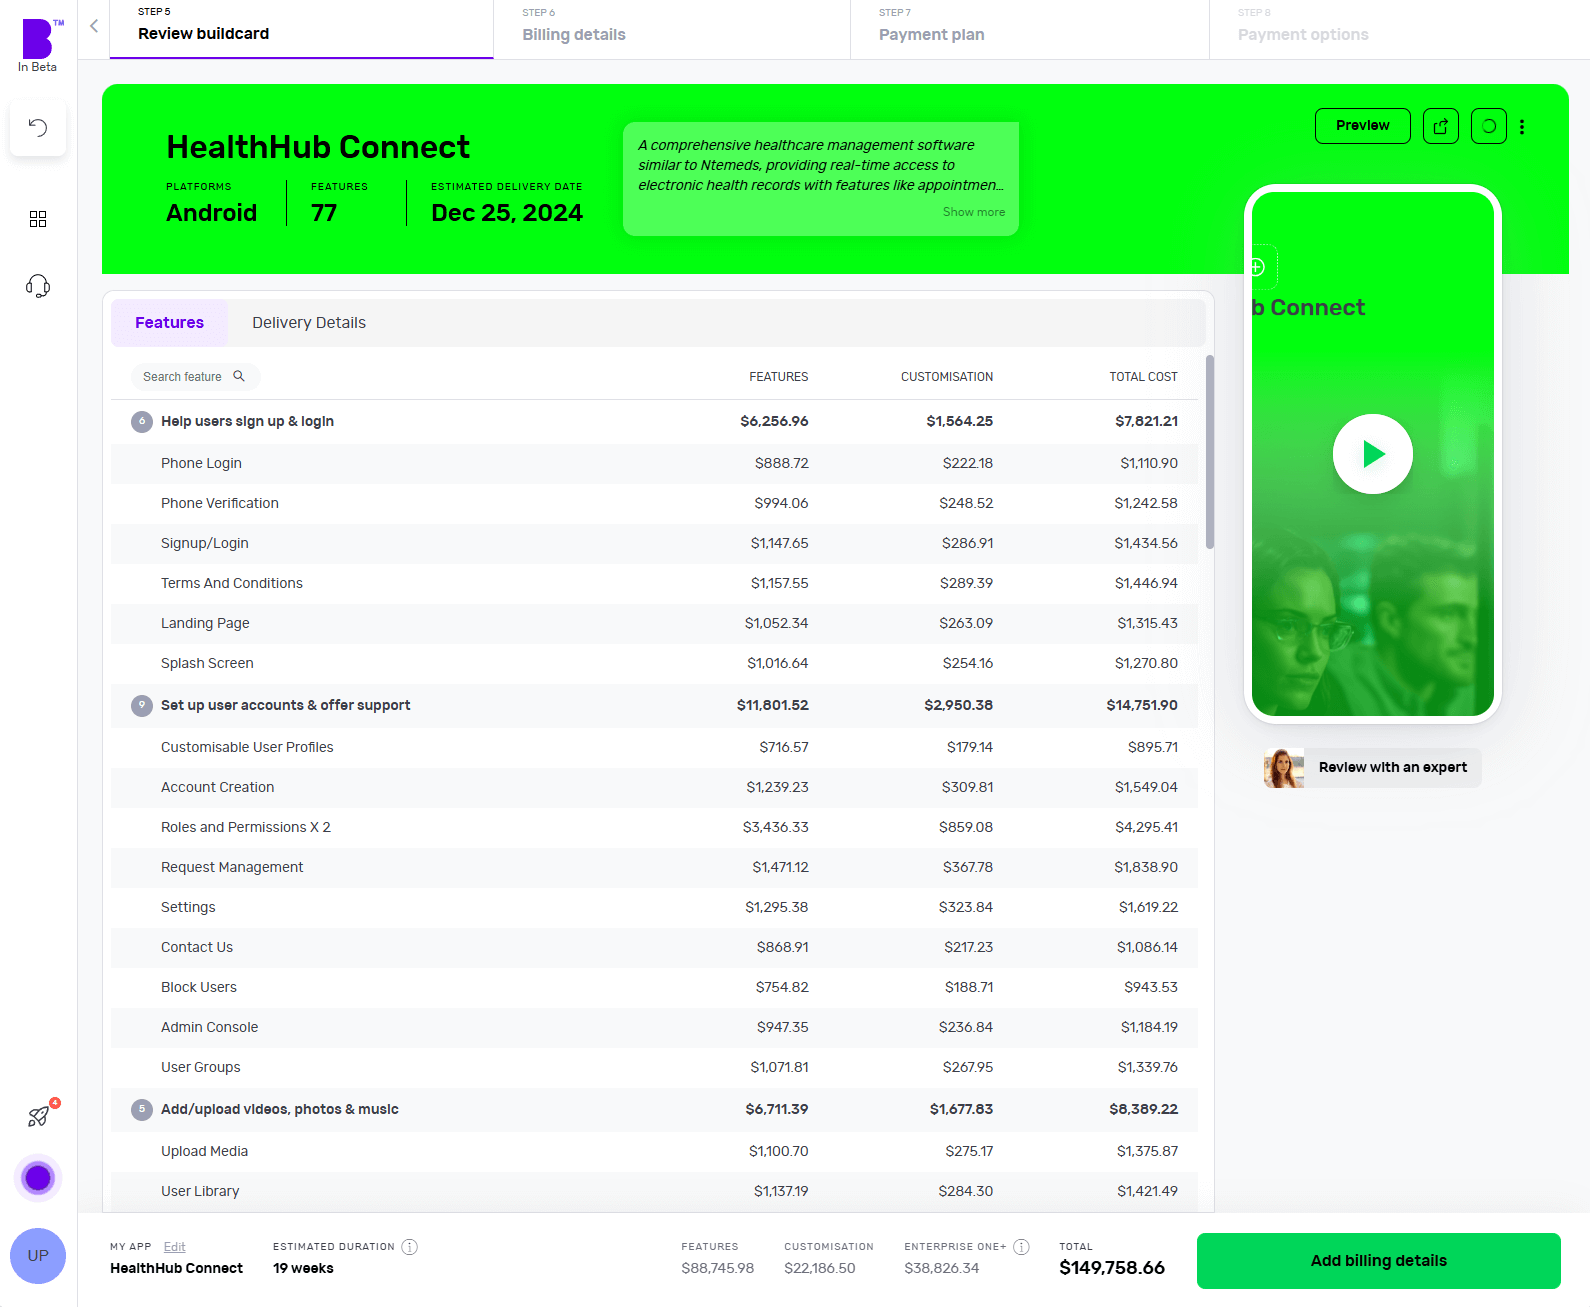
Buildcard provides you with a bird's eye view of all the selections you made in the previous steps. Here, you can review all the features, cost per feature and delivery details.
You can also download the PDF of Buildcard or invite others to show your team members what you’re building.
If you want to make any changes, simply click on 'Edit Buildcard' under the 3 dots in the top-right corner.
If you’re happy with everything, click on 'Add billing details' to go to the next section. Alternatively, if you want to review it with experts, click on 'Review with an expert'.
7 - Select your payment plan
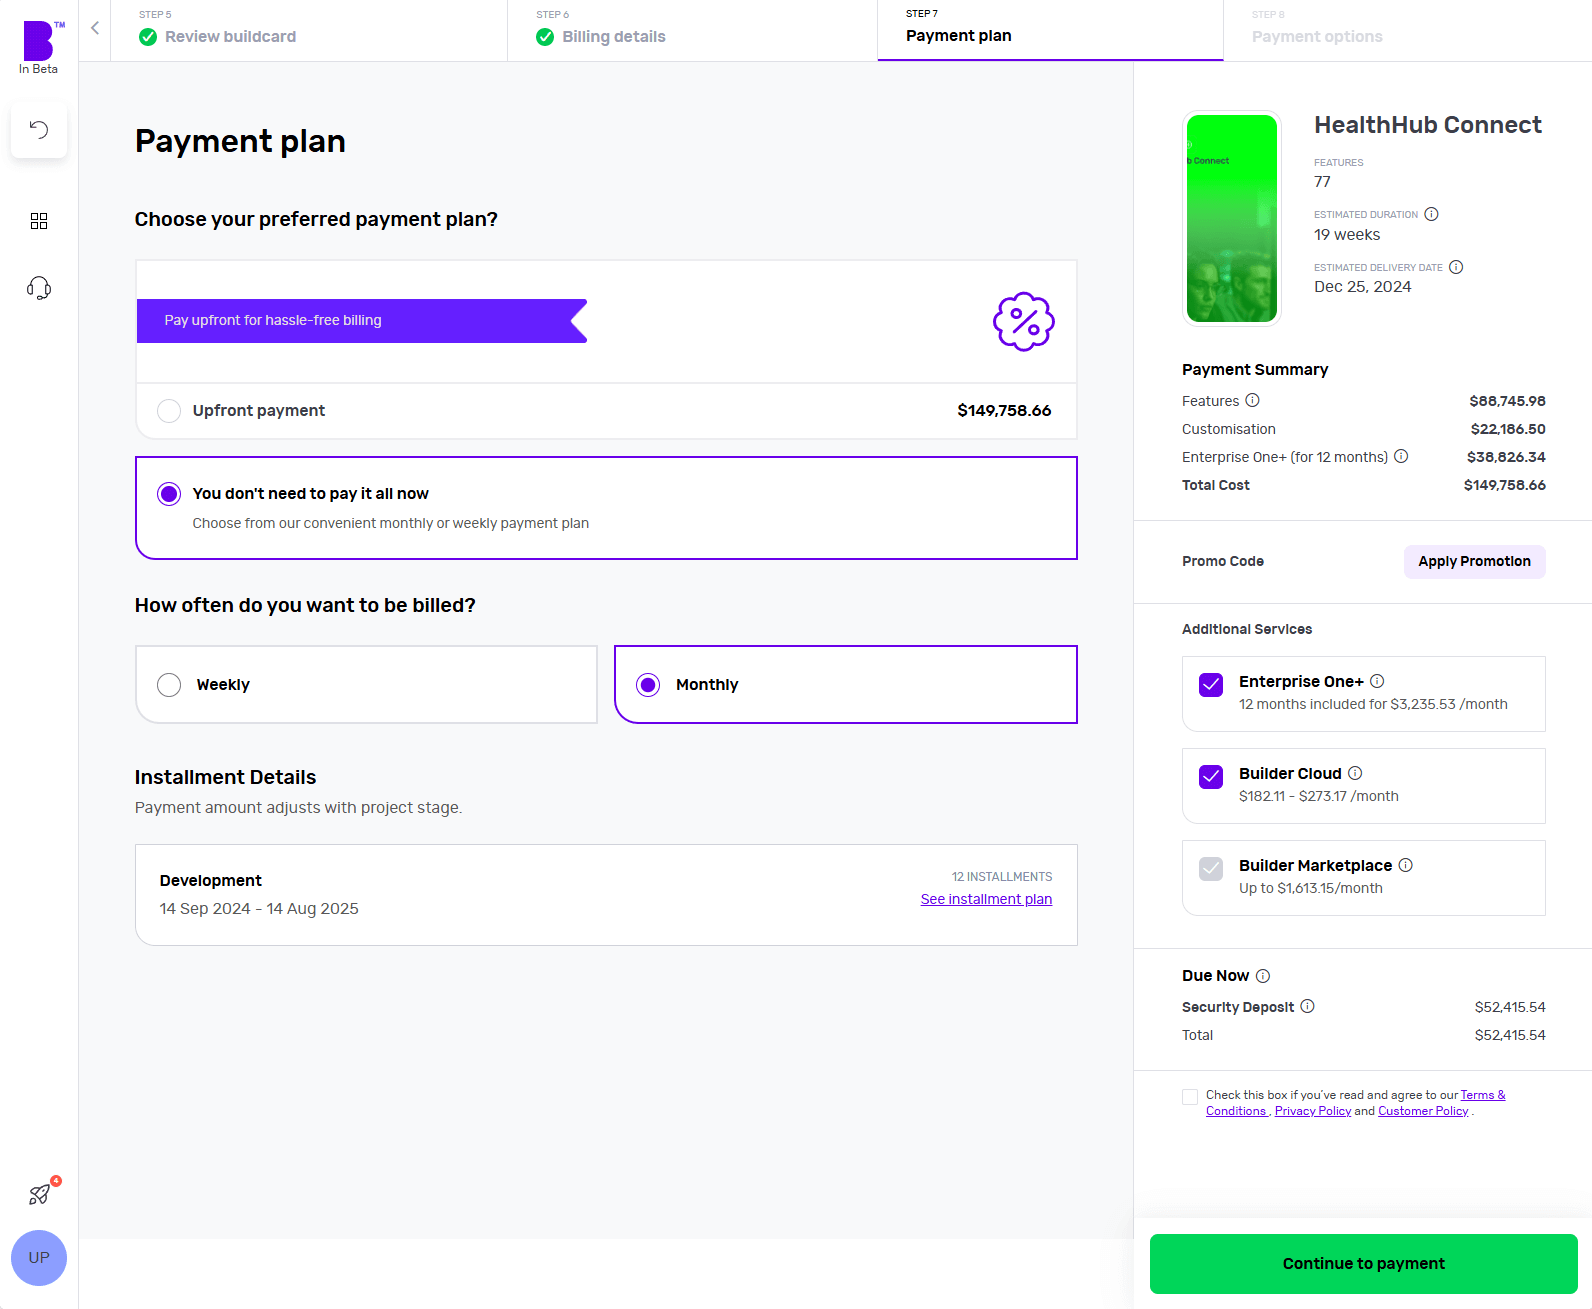
We offer weekly or monthly payment instalments, with visible payment dates and amounts for each option. You can also choose to pay upfront to reduce the cost of your build.
Simply select your preferred billing cycle, then click 'Continue' to proceed.
You’ll be asked to input your payment details and agree to the terms and conditions. Once that’s done, click 'Continue to Payment'.
Once your payment is done, you can set up a meeting with our product managers to begin your software development.
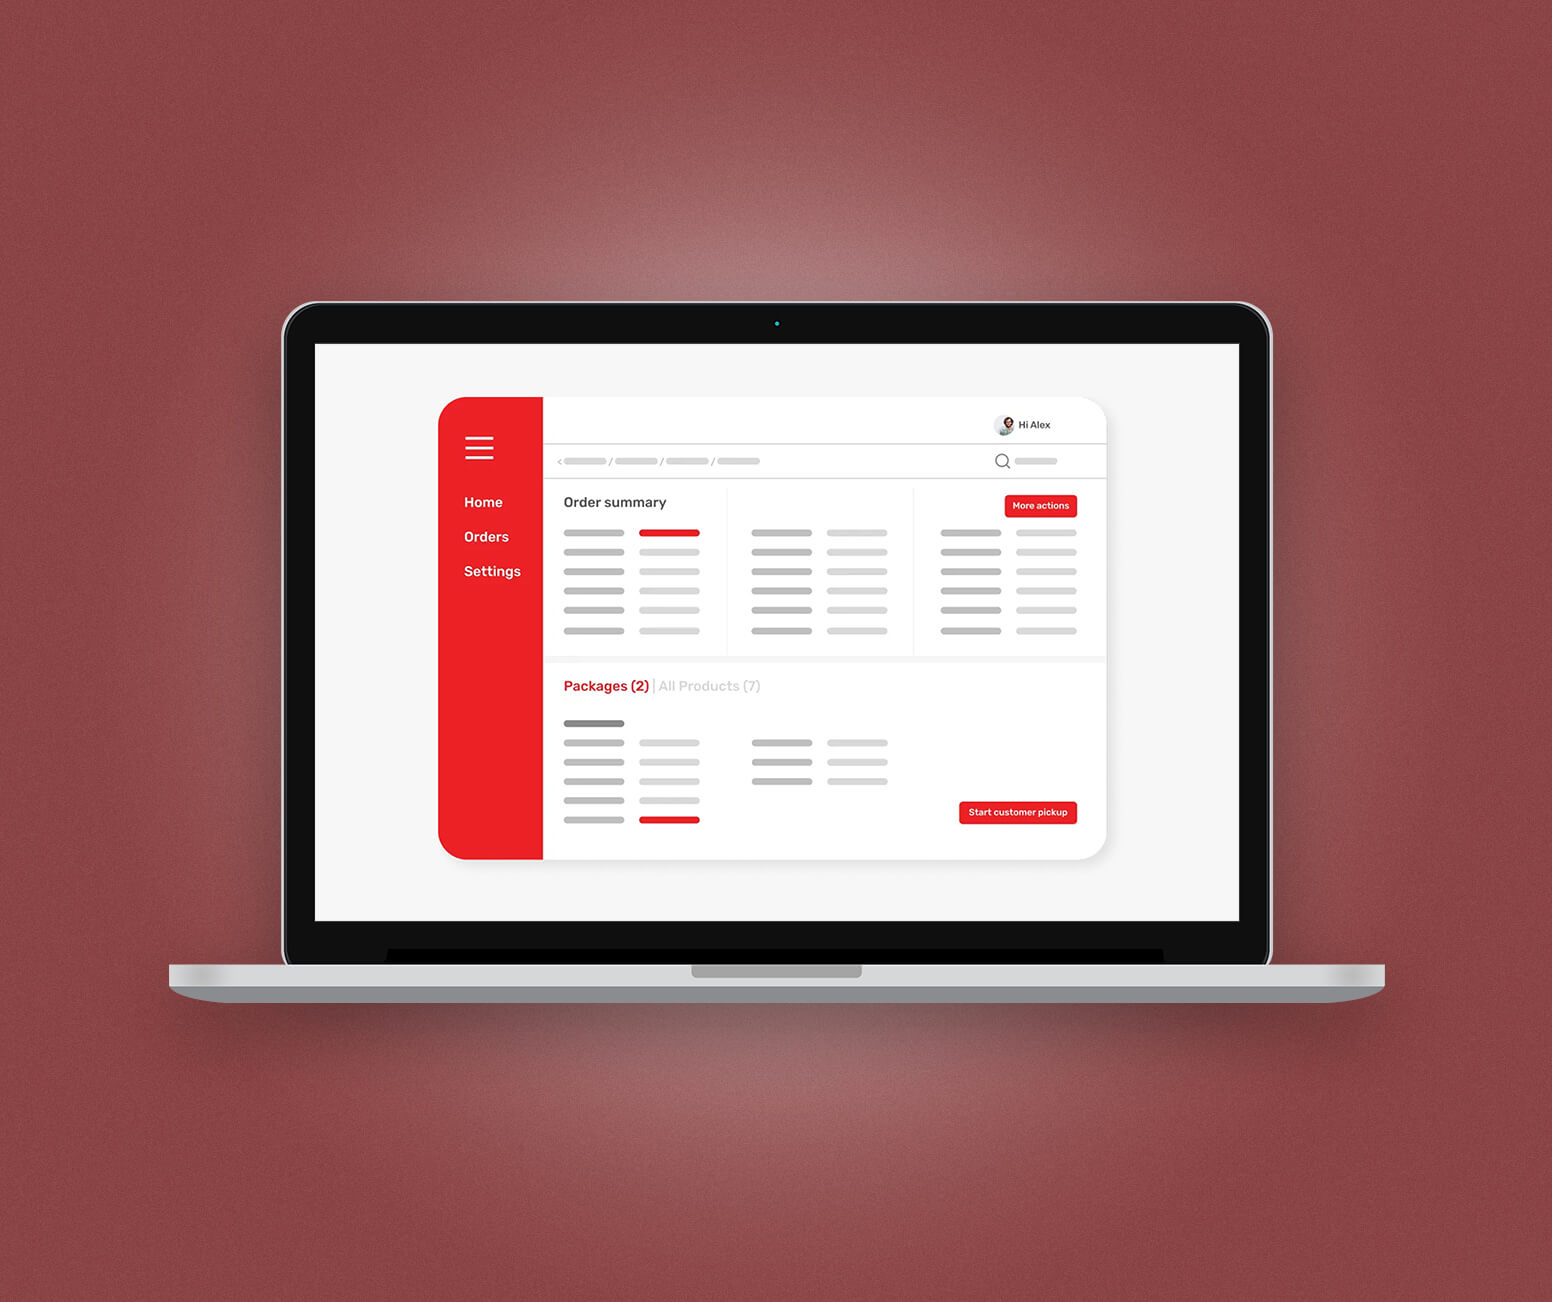
8 - Monitor your software build in real-time
With Builder Home, your real-time project dashboard, you can monitor development progress and make sure your software is exactly the way you want it.
This includes access to a suite of collaboration tools to help improve your software design. You can chat with your team of experts in Builder Meet, brainstorm in Builder Whiteboard and visualise your ideas with free Tailor-made prototypes from Builder Now.
Conclusion
When you’re starting to build software, it can be overwhelming with the endless number of paths in front of you. The software development process cuts the clutter and helps you stick to a plan.
However, strictly following it can be challenging, especially if your internal tech teams are already stretched thin.
This is where working with the best in the industry significantly increases your chances of successfully building high-quality software.
Builder.ai’s composable software platform helps you build your software efficiently. We:
✅ - Assign you a dedicated project manager, who keeps all stakeholders on your software project aligned and on track; you never need to speak to a software developer or write a single line of code
✅ - Speed up development timeby giving you access to a comprehensive library of reusable features, fitted together by AI
✅ - Give you upfront costs and competitive timelines so your project stays under control
If that’s something you’d like to explore, please get in touch 👇
Want to start your app project with us?
Book a demoSpeak with one of our product experts today.
By proceeding you agree to Builder.ai’s privacy policy and terms and conditions
Gaurav is the SEO Content Writer at Builder.ai. Being an Engineer and Marketing MBA, he has a knack for converting technical jargon into marketing content. He has 8+ years of experience creating content and designing marketing campaigns that drive organic growth for B2B companies and tech startups.


 Facebook
 X
X LinkedIn
 YouTube
 Instagram
 RSS
RSS