Ever wondered how long it takes to build an app from scratch? It’s one of the most frequently asked questions by businesses, only after how much it costs to build an app.
The truth is, there’s no simple answer.
Much like building a house, the timeline for developing an app can vary significantly based on several factors. The complexity of design, the required features, the operating system and necessary integrations — all play a crucial role in determining how long the development process will take.
In this blog, we’ll walk you through detailed timelines and breakdown each stage of app development. Plus, we’ll share with you a proven way to shorten your app development timelines.
Let’s dive in 👇
What’s the average time of developing an app?
In a nutshell, the average span for creating an app is 3 to 12 months. This huge variance is because it depends on whether the app is simple, complex or mid-level.
Simple apps
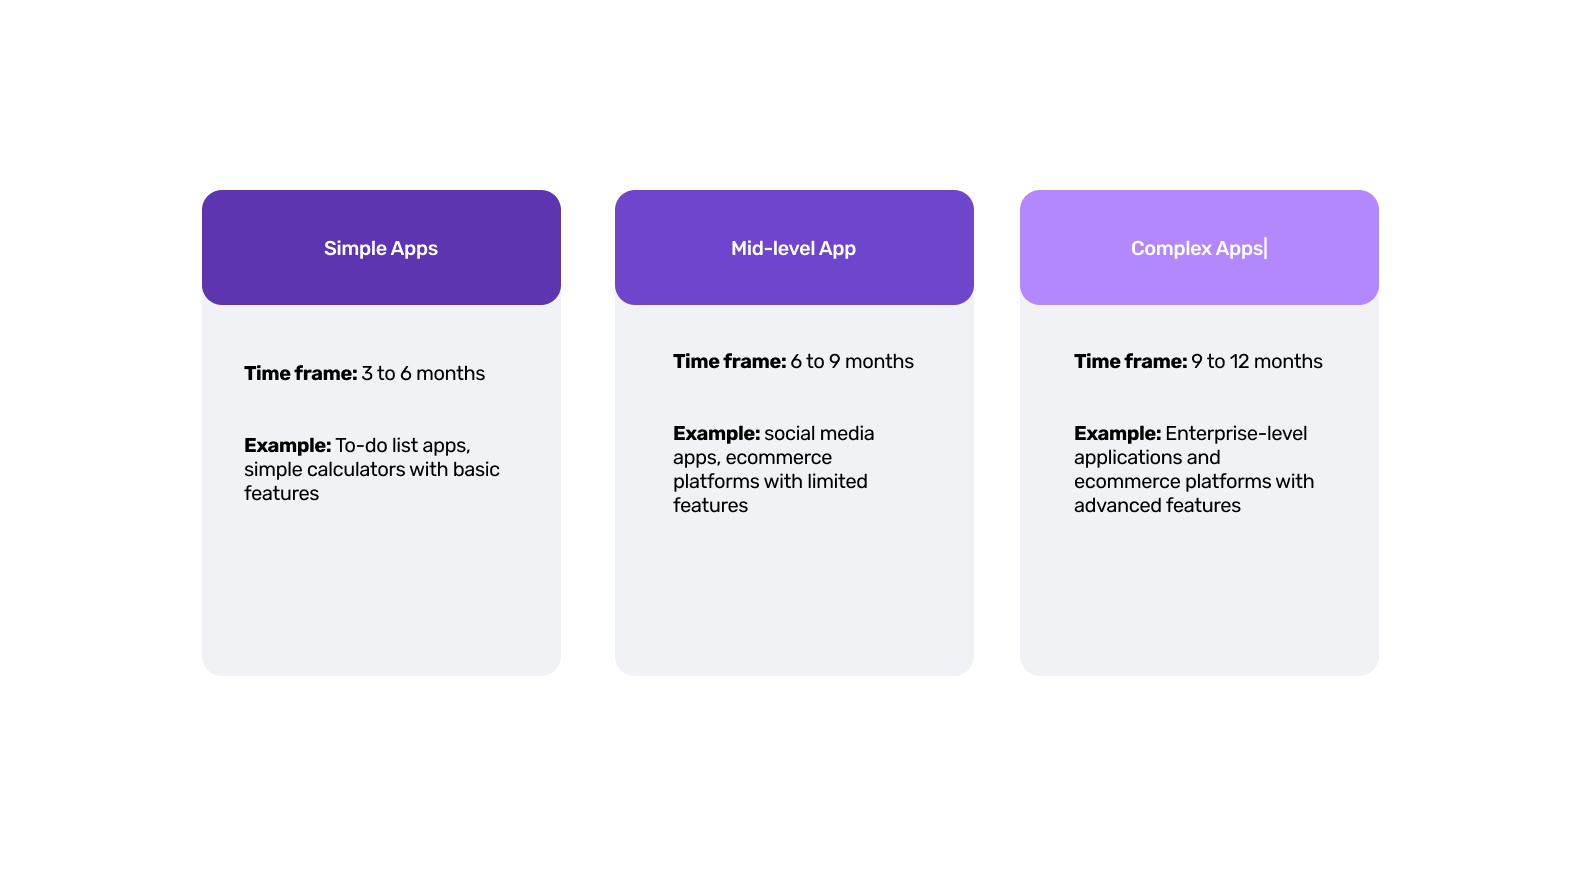
Simple apps with basic features usually take 3 to 6 months to make. These apps usually have a straightforward user interface, minimal features and need less complex backend development. Examples include To-do list apps, simple calculators or basic informational apps.
Mid-level apps
Mid-level apps generally take between 6 to 9 months to develop. These apps have advanced user interfaces, some level of backend development and additional features like user authentication, basic data storage and simple Application Programming Interfaces (APIs). Examples of mid-level apps include social media apps, ecommerce platforms with limited features or fitness tracking apps.
Complex apps
Complex apps with advanced features and integrations can take 9 to 12 months or even longer to develop.
These apps often need extensive backend development, complex user interfaces and advanced features such as real-time data processing, Machine Learning or extensive third-party integrations. Examples include enterprise-level applications and ecommerce platforms.
App development times by stages
App development goes through different stages. Here’s a detailed overview of each stage and how much time it might take to process app development.
1 - Discovery stage timeline
While some startups and business owners might be tempted to dive straight into design and development, it's important to take your time and first ideate your app.
Your app development should go through a conceptualising process, which involves forming a right idea with a well-defined purpose, goals and creating a project plan.
Here, you'll be responding to challenging questions such as which kind of app you want, what features you'd want in that app or which operating system - cross-platform, iOS app or Android app — will you develop for?
How long does it take to research the app idea?
Typically, it should take up to 3–4 weeks to ideate and plan tasks for your app.
2 - Market research timeline
During this phase, developers and designers conduct surveys, interviews and competitive analysis to gather insights into target audience preferences, behaviours and pain points.
This information then helps identify gaps in the market that your app can fill, ensuring its competitiveness and relevance.
This process can take another 2-3 weeks for a comprehensive and detailed research.
3 - Design and development stage timeline
Designing in the development stage of an app involves creating detailed User Interface (UI) and User Experiences (UX) based on approved wireframes and prototypes.
Designers work closely with developers to ensure that the visual elements, such as layouts, colour schemes and typography, aren't only aesthetically pleasing but also functional and intuitive.
This stage also includes iterative testing and refinement to address usability issues and incorporate feedback from stakeholders.
How long does it take to design the app?
This stage could take around 4 to 5 weeks.
4 - Coding stage timeline
The development stage of an app involves writing and integrating the code that brings the design to life. Here, app developers work on both front-end and back-end components, ensuring that the app is functional, secure and scalable.
This phase includes implementing APIs, databases and other necessary technologies.
How long does it take to code the app?
The collective timeframe for the coding stage can be 6–12 weeks, which can vary significantly based on the complexity of the app.
5 - Testing stage timeline
The app testing stage is crucial for ensuring the app's quality and reliability. This phase involves various types of testing, including unit testing and integration testing to identify and fix bugs, performance issues and usability problems.
This process can easily add another 2–4 weeks to the development time.
6 - Product launch timeline
The deployment stage in the development of an app is where the finalised product is prepared for release and made available to users. This involves packaging the code, configuring the server environment and ensuring all dependencies are in place.
The app is then uploaded to app stores or web servers, and rigorous final testing is conducted to ensure a smooth launch. The total timeframe for this stage is 1–2 weeks.
7 - Maintenance and updates
App maintenance is the process of maintaining your app post-launch, making sure that your software is updated, bug-free and secure.
In this stage, you monitor your app’s performance, address user feedback and release updates to improve functionality and security of your app.
That said, the maintenance stage is never-ending as it’s requires a continuous effort to fix bugs and introduce new features based on user needs.
Key aspects slowing down app development timelines
Various factors could lead to a slowed-down app development process. Here’s some factors which could affect the speed of app development.
Poor planning and requirement gathering
Poor planning can lead to unclear objectives and confusion among team members, causing frequent changes and revisions that extend timelines. Also, incomplete or vague requirements result in rework and delays as developers struggle to understand what needs to be achieved.
Inefficient development practices
Inefficiency in the development process can consume excessive time on manual tasks and repetitive processes, such as manual testing and code integration. Additionally, the lack of automation and the accumulation of technical debt can lead to increased errors and longer debugging times, further delaying the project.
Complexity and dependencies
Overly complex app architectures can be difficult to develop, integrate, test and maintain, leading to longer development cycles.
Quality Assurance and inadequate testing
Insufficient testing can lead to the discovery of bugs and issues late in the development cycle, requiring more time to fix.
Resource crunch
Resource constraints slow down app development by limiting the availability of the necessary workforce, budget and tools, leading to delays and reduced productivity. Additionally, skill gaps within the team can cause hindrance and extend timelines as team members struggle to complete specialised tasks.
How to speed up the app development process?
You can speed up the app development process through multiple processes. Here’s a detailed overview of it.
Streamline planning and requirements
- Define clear objectives - establishing clear goals and objectives at the outset ensures what is to be achieved. This reduces the likelihood of unnecessary revisions.
- Agile methodologies - breaking down the project into manageable tasks, allows for continuous feedback and adjustments.
- Prioritise features - prioritise features based on user needs and business value to focus on what matters most.
Optimise the development environment
- Automate testing - implementing automated testing can significantly reduce the time spent on manual testing, ensuring faster and more reliable code deployment.
- Continuous Integration/Continuous Deployment (CI/CD) -CI/CD pipelines automate the process of integrating code changes, building the application and deploying it, reducing manual intervention and errors.
Enhance collaboration and communication
- Use collaboration tools - Slack, Trello and Jira can streamline communication and project management, ensuring everyone is up-to-date and on track.
- Regular stand-ups - daily or weekly stand-up meetings help in addressing issues quickly and keeping the team aligned with project goals.
- Document everything -clear and concise documentation ensures that everyone has access to the information they need, reducing confusion and delays.
Leverage pre-built components and libraries
- Reusable code -utilising pre-built components and libraries can save time and effort, allowing developers to focus on more complex tasks.
- Third-party APIs - integrating third-party APIs can add functionality without the need to develop everything from scratch.
Focus on User Experience (UX) and User Interface (UI)
- Prototyping -creating prototypes early in the development process can help identify and fix UX issues before they become costly to address.
- User testing - regular user testing ensures that the app meets user expectations and requirements, reducing the need for major revisions later.
- Iterative design -an iterative design approach allows for continuous improvement based on user feedback, ensuring a better final product.
Monitor and optimise performance
- Performance Testing -regular performance testing helps identify areas for optimisation, ensuring the app runs smoothly.
- Analytics and feedback - using analytics tools to monitor app performance and user behaviour can provide valuable insights for continuous improvement.
Shorten your app development timelines with Builder.ai
Around 80% of all software and apps are made up of around 650+ features. At Builder.ai, we package each basic feature as a reusable Lego-like block. You simply need to explain your idea to our AI companion, Natasha, and she uses these blocks to rapidly create an outline of your app.
The work is completed faster and cheaper because Natasha handles all the repetitive coding. Then it’s off to our app design team and developers. They personalise it and create any bespoke elements you need.
To build your app at speed, simply head over to Builder Studio. The Builder Studio platform has been built with user convenience in mind and intuitively guides you through the software creation process.
Here’s how you can build your custom software in no time 👇
Want to start your app project with us?
Book a demoSpeak with one of our product experts today.
By proceeding you agree to Builder.ai’s privacy policy and terms and conditions

1 - Discuss your ideas with Natasha
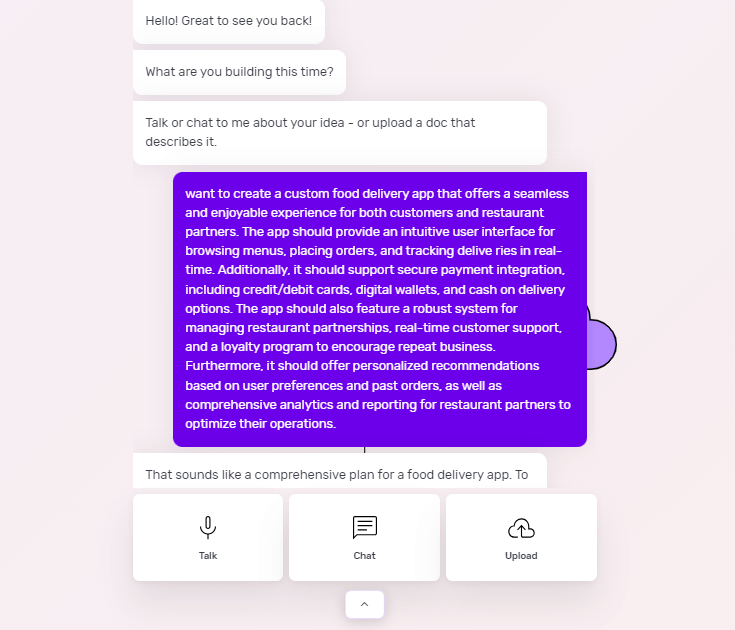
On Builder Studio, you’re welcomed by Natasha. You can express your software ideas to Natasha via voice, text or uploading a PDF or doc file.
Before you chat with her, have a checklist of features and be as descriptive as possible about your app idea. The more detailed information you give to Natasha, the better her suggestions will be.
For instance, if you’re building a food delivery app, your prompt could look like this:
“I want to create a custom food delivery app that offers a seamless and enjoyable experience for both customers and restaurant partners. The app should provide an intuitive user interface for browsing menus, placing orders, and tracking deliveries in real-time. Additionally, it should support secure payment integration, including credit/debit cards, digital wallets and cash on delivery options.
The app should also feature a robust system for managing restaurant partnerships, real-time customer support and a loyalty program to encourage repeat business. Furthermore, it should offer personalized recommendations based on user preferences and past orders, as well as comprehensive analytics and reporting for restaurant partners to optimize their operations.”
Based on your prompt, Natasha will ask you some supporting questions and you simply need to answer them based on your requirements.
2 - Choose a base
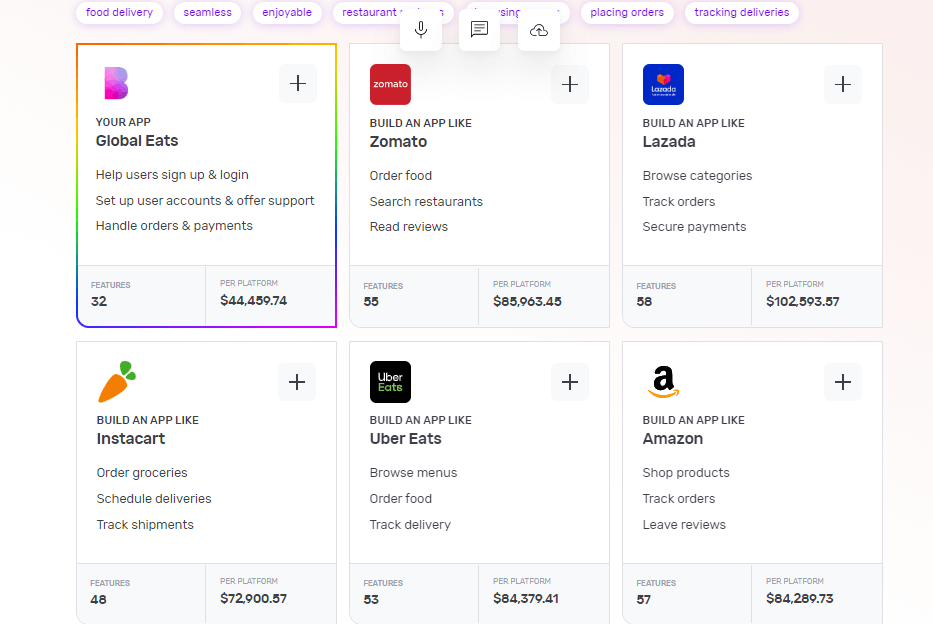
Once Natasha has your requirements, she’ll create a custom framework for your app based on everything you tell her. She'll also suggest some pre-built bases she thinks are best suited for your app.
Continuing from the above example, once you tell her to create a food delivery app, she’ll suggest a custom base similar to Zomato and share any matching core bases as well.
You can choose up to 3 you feel are related to your app idea by simply clicking the ‘+’ icon. These selections make it easier for us to understand the features your app needs. When you’re ready, click 'Next'.
3 - Make it mine
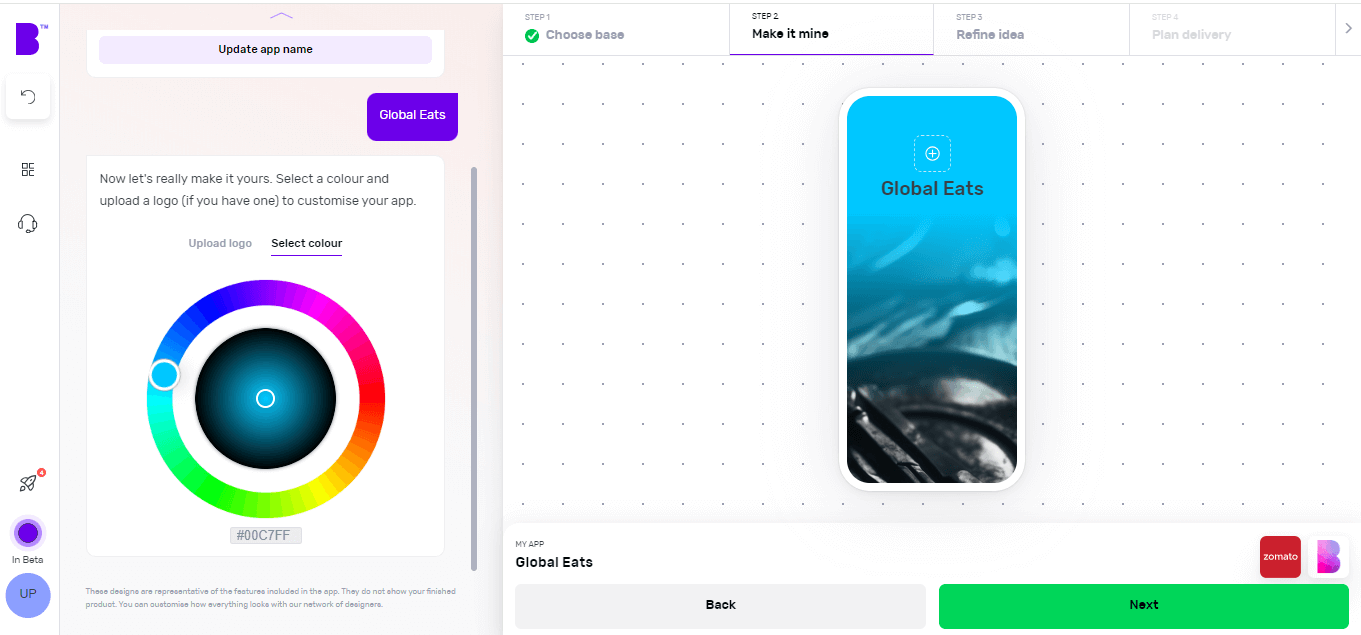
The 'Make it mine' step aligns your software with the identity of your brand. In this step, you provide your software’s name, choose the colour scheme using the colour wheel and upload the logo of your brand.
Once you’ve personalised your software’s name, colour and logo, you can click ‘Next’.
4 - Refine your app idea
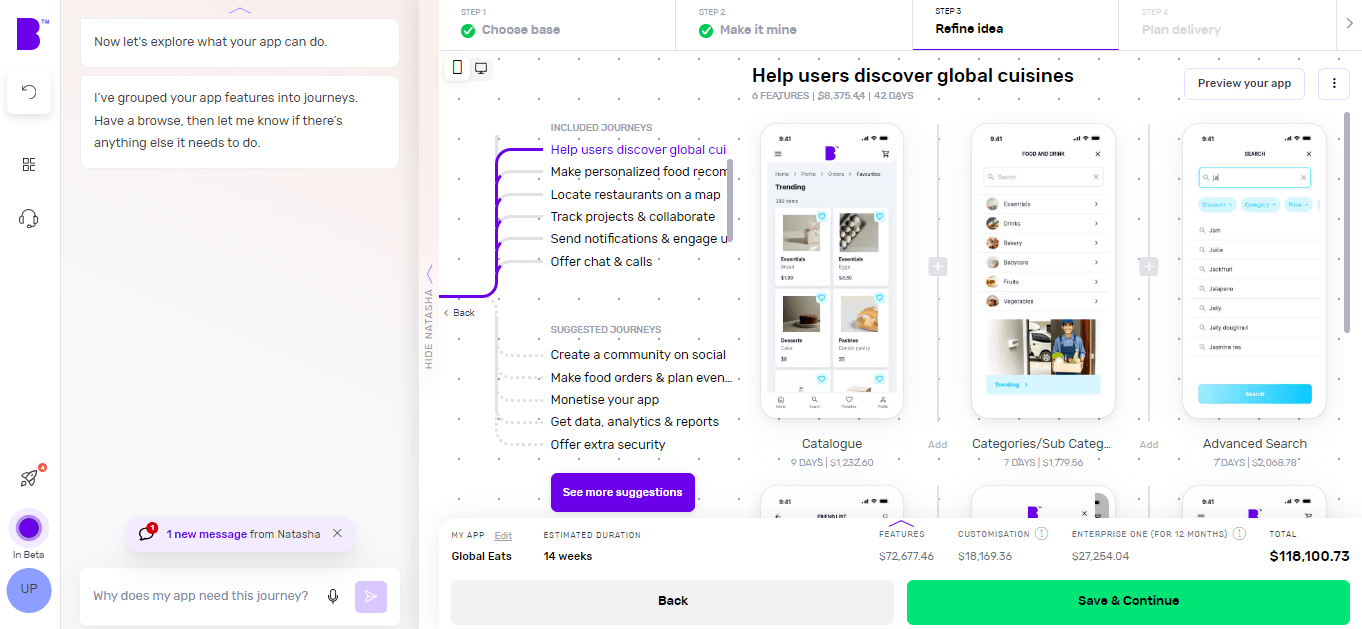
Now comes the fun bit.
In the 'Refine idea' stage, you can review and customise your app journeys and features and also create an instant prototype of your app.
Journeys
In only a matter of seconds, Natasha createsapp user journeys with corresponding features.
Go through these journeys carefully and see if your app needs additional journeys. For instance, check if you want to add journeys for tracking logistics, customised order status or any other relevant journey.
To add journeys, click on 'See more suggestions'. Doing so will open the list of pre-built journeys. You can browse the list and select the journeys you’re missing. You can also add custom journeys by clicking on 'Add custom journey'.
Features
By clicking on individual journeys, you can see the feature list each journey contains. Doing so will open the features list each journey contains. You can scroll through the features list and check if a journey contains non-essential features or if you want to add extra features.
To remove a non-essential feature, you can hover over the feature and click ‘Remove’. This way you can manage project costs. If you’re not sure what features to remove, you can click on an individual feature and check the label at the top. We highly recommend keeping the ‘Essential Features’.
In case you want to add more features, you can simply click the ‘+’ button. Here you can go through different categories or use the search bar to look for missing functionality. In case you don’t find the feature you’re looking for, you can also add a custom feature by clicking on 'Add custom feature'.
Instant prototype and user flow
Once you’re happy with the journeys and features of your app, you can create a prototype by clicking on 'Preview your app' in the top-right corner.
Sign up and Natasha will create a working prototype of your app. You can click on the screen at different areas to progress through the journey.
You can also see theuser flow by clicking on the 'Flow mode' at the top of the screen to see how users will interact and navigate within your app.
If you need extra help, Natasha is on hand to help and you can interact with her at any time by clicking on 'Speak to Natasha'.
She’ll provide you with suggestions and help you find features or journeys from the library. Or you can click on 'Book a demo' to talk to our product managers who’ll guide you through your app development journey.
Click on 'Save & Continue' to go to the next step and also to save your progress or it might get lost.
5 - Plan delivery
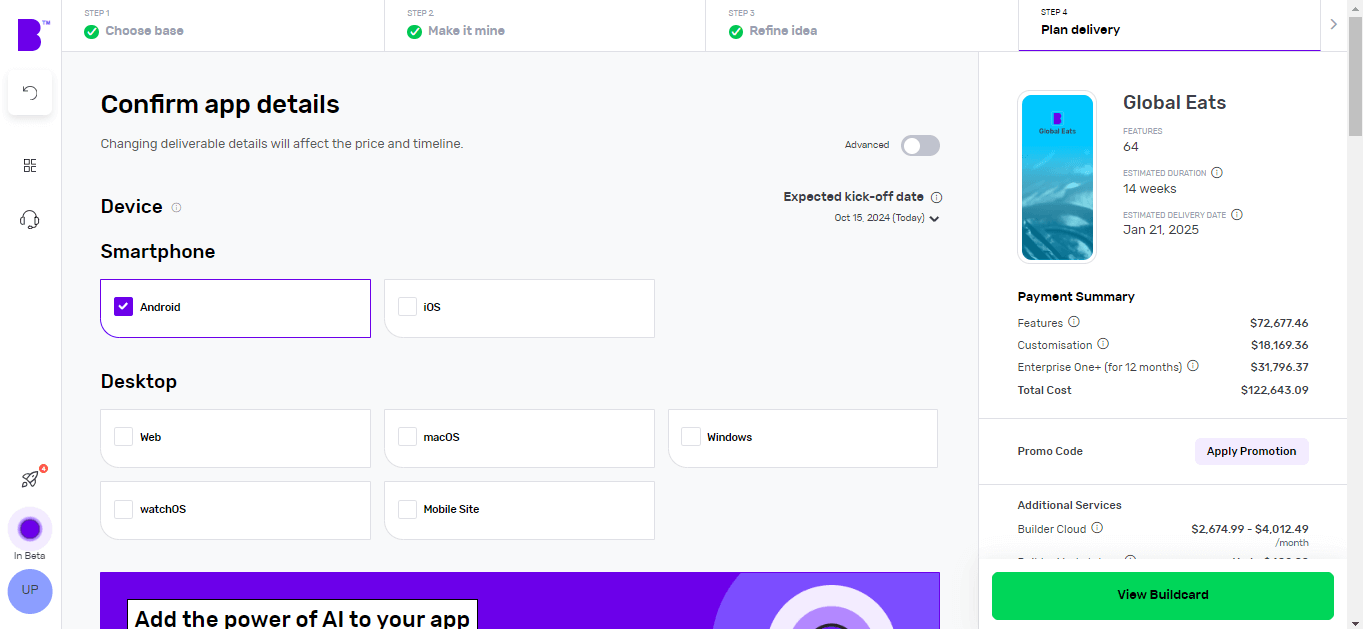
It’s time to choose the platforms you want your app to be available on. Want a desktop app? Click Windows or macOS. Fancy a mobile app? Hit Android or iOS. Not sure about the platform? Choose multiple platforms and see how they change the price and timelines.
Next, you can choose to add Natasha to your platform to supercharge the customer experience of your app. Natasha uses Large Language Models (LLMs) to engage your customers in fluid, human-like conversations.
In the development speed section, you can change the speed of each development phase according to your needs. The faster the development speed, the higher the costs and vice versa.
Next up is Design. If you have your app designs ready, you can save on your costs by clicking 'You have design' and we’ll reduce your costs accordingly. You can share your design files (preferably in Figma) and our designers will upload them, so you can kick them off straight away.
If not, you can choose the 'We do your designs' option. Here, you simply need to add your brand assets and we'll do everything from storyboarding to fully designed screens.
Now it’s time to plan the phases of your project. Here you get 3 options:
- Clickable prototype: you’ll get a visual representation of your app to test with users
- Basic build: you’ll get an MVP (Minimum viable product) – a hard-coded but simplified version of your idea; this allows you to collect feedback and iterate before you do a full build
- Full Build: you’ll get market-ready app, including a kick-off with our product team and review sessions
After that, you need to select your support plans. With 'Full Build' you get one year of Studio One support included free of charge.
Once you’ve planned your delivery, click on 'View Buildcard'.
6 - Review Buildcard
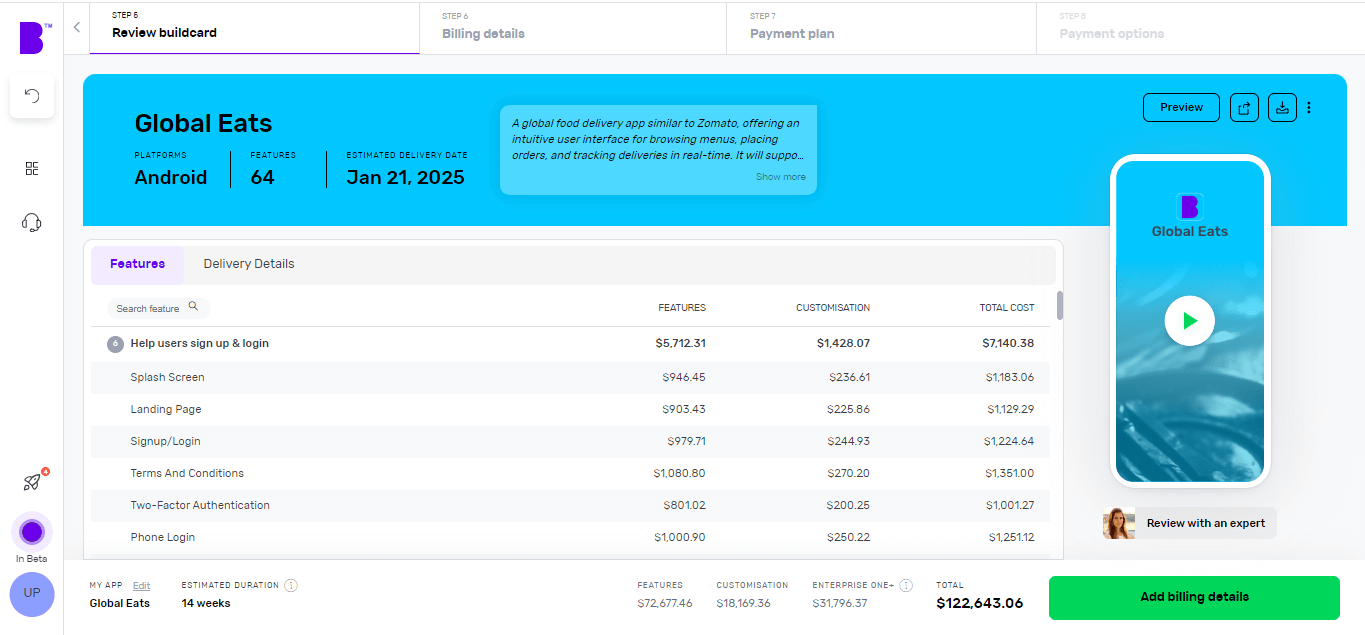
Buildcard provides you with a bird's eye view of all the selections you made in the previous steps. Here, you can review all the features, cost per feature and delivery details.
You can also download the PDF of Buildcard or invite others to show your team members what you’re building.
If you want to make any changes, simply click on 'Edit Buildcard' under the 3 dots in the top-right corner.
If you’re happy with everything, click on 'Add billing details' to go to the next section. Alternatively, if you want to review it with experts, click on 'Review with an expert'.
7 - Select your payment plan
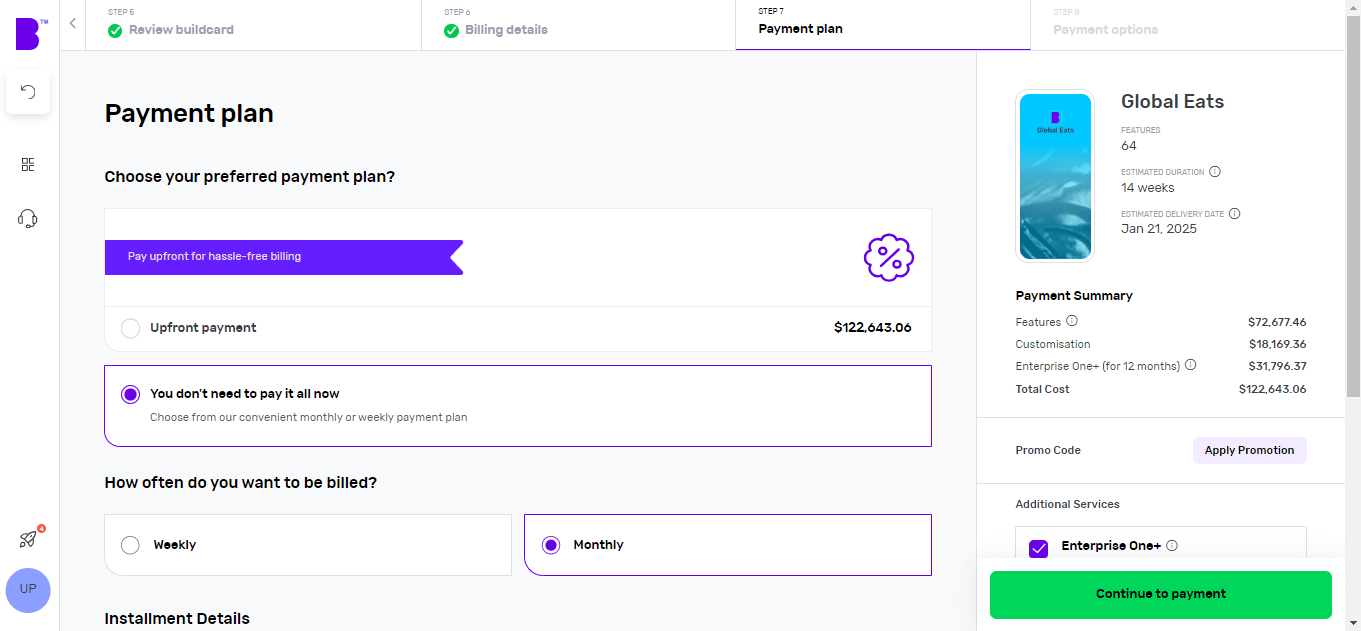
We offer weekly or monthly payment instalments, with visible payment dates and amounts for each option. You can also choose to pay upfront to reduce the cost of your build.
Simply select your preferred billing cycle, then click 'Continue' to proceed.
You’ll be asked to input your payment details and agree to the terms and conditions. Once that’s done, click 'Continue to Payment'.
Once your payment is done, you can set up a meeting with our product managers to begin your app development.
8 - Monitor your app build in real-time
With Builder Home, your real-time project dashboard, you can monitor development progress and make sure your app is exactly the way you want it.
This includes access to a suite of collaboration tools to help improve your app design. You can chat with your team of experts in Builder Meet, brainstorm in Builder Whiteboard and visualise your ideas with free Tailor-made prototypes from Builder Now.
Conclusion
The time it takes to develop an app can vary significantly based on its complexity, the features required and the development process itself.
From initial planning and design to development, testing and deployment, each stage plays a crucial role in determining the overall timeline. While simple apps may take 2–3 months, more complex projects can extend to 8–10 months or even a year.
This is where working with the best in the industry significantly increases your chances of successfully building a high-quality app.
Builder.ai helps you build your app efficiently. We:
✅ - Assign you a dedicated project manager, who keeps all stakeholders on your app project aligned and on track; you never need to speak to a software developer or write a single line of code
✅ - Speed up development timeby giving you access to a comprehensive library of reusable features, fitted together by AI
✅ - Give you upfront costs and competitive timelines so your project stays under control
If that’s something you’d like to explore, please get in touch 👇
Want to start your app project with us?
Book a demoSpeak with one of our product experts today.
By proceeding you agree to Builder.ai’s privacy policy and terms and conditions

Harsh Priya is a writer at Builder.ai. She has over 3 years of experience in content marketing, spanning across fields like AI, Machine Learning, software, tech, health and lifestyle. With a background in English literature and a fervent passion for research and analysis, Harsh transforms complex concepts into compelling and insightful narratives that educate and drive significant reader engagement.






 Facebook
 X
X LinkedIn
 YouTube
 Instagram
 RSS
RSS
